Showing posts with label fondant. Show all posts

Saturday, May 3, 2014

Pretty in Pink

I was asked by a friend to design a cake for a baby shower today. The mom-to-be loves lace and pearls and of course, lots of pink since she is having a girl. Pale pink fondant with lace and pearls... yeah, I can do that. I was excited to use my new "Sugar Dress" product for making the lace. Wow... so much easier than "Sugar Veil." That's the subject of another blog post. I brushed the fondant pearls with plenty of pearl dust so they looked like real pearls, and then placed on some beautiful gumpaste flowers along with a shimmery bow. . . very pretty. I'm still practicing making gumpaste flowers, but each one turns out a little better. When I started decorating cakes 37 years ago, I learned how to decorate everything with buttercream and royal icing, including flowers. So, this old gal is learning new techniques everyday with fondant and gumpaste. I'm actually having fun with it too. 


Monday, October 29, 2012

Fondant Survival

Here is a "sweet" little video that answers some questions that you might have when working with fondant, courtesy of Sweet Wise.

Sunday, September 30, 2012

Scrolls...2 wedding cakes, 2 different icings, 2 different kinds of scrollwork, and 2 different kinds of roses...

The design of the week for this week's wedding cakes was scrolls... 2 wedding cakes, both with scrollwork, but completely different.

Cake #1...

Buttercream icing
Piped scrolls
Fresh flowers


Cake #2

Fondant
Fondant/gumpaste scrolls cut from Cricut Cake
Gumpaste flowers


Sunday, August 5, 2012

Beating all records...

In my 36 years of cake decorating, tonight I had the fastest order and pickup ever, and all thanks to technology... specifically Facebook.

I have an order for a large 4-tier wedding cake next Saturday... all done in ruffles. Since I have never done a cake like this, I did research online, and found a tutorial...thanks to Kara Buntin at A Cake To Remember LLC.  I had cake batter left from cake samples I did on Thursday, so I baked a small 2 layer 6 inch round to practice on. The cake was iced in buttercream, the ruffles were made with 50/50 fondant and modeling chocolate. After a little practice, I got the hang of it, and I think the wedding cake should turn out fine. I'll just have to allow quite a bit of time. 

In the meantime, the last thing I needed was an extra cake sitting around the house. So... I took a picture, posted it on Facebook, and asked if anyone nearby would like a free cake. I said that the cake would go to the first person that responded. They would just have to come and pick it up. So, within a matter of minutes, Michael Kuhns responded, his wife, Jennifer, was out of the house, and within 20 minutes of my posting, the cake was out the door. How's that for a quick response? Gotta love Facebook!


Tuesday, May 1, 2012

Having fun with veggies ...

As I have mentioned before, I love learning new skills. Last week, I wanted to try something different for a veggie display we were doing for a catering job. So I purchased several inexpensive glass containers and a mirror, and put the veggies with green glass marbles and ice .... to keep the veggies cool ... into the different containers, along with a fun edible veggie arrangement. We always serve our veggies with a yummy dill dip. Here's the final results ...


The menu also included two warm appetizers, a fruit display, chocolate peanut butter rounds, mint rounds, and a small wedding cake. The flavor was yellow with Bavarian creme filling, which is always a big hit with the guests.
 Spinach spirals and pepperoni pizza puffs

 Chocolate peanut butter rounds and mint rounds, both made with Ritz crackers

 Yellow cake with Bavarian creme filling


Monday, January 2, 2012

Update on December 3 blog post...

I put all 6 cups of sifted powdered sugar in the new Kitchenaid bowl and let it run on the low speed until it was all combined and pulled from the sides and bottom of the bowl. I let it knead for just a little longer, then took it out of the bowl, covered it with Crisco, and put it into the Ziplock bags to rest overnight. The Kitchenaid did everything...no kneading by hand...what a time and energy saver. Did I mention, I love my Kitchenaids?

Saturday, December 3, 2011

I love my new KitchenAid!!


I know, you're probably saying "she bought another KitchenAid?" Well, I have had my other ones for an eternity and yes, they still work, but...this one was on sale at Costco for $50 off...and it's a professional model, so it's more heavy duty...and it has a larger, wider bowl...and it matches my KitchenAid food processor and my KitchenAid blender...and I used my cake money...and I think I deserved it...and, and, and... Anyway, I absolutely love it! It's very easy to work with, and the speeds start out very slow, especially compared to my old ones, which really means less mess. 

So I needed to make a batch of fondant last night for a cake I was doing today, so I thought I would check out how the new mixer would handle the job...oh wow! It was perfect! I first slightly greased the bowl, then put in 5 cups of sifted powdered sugar. I poured in the melted marshmallow mixture after putting on the heavy duty spiral dough hook, and on a low speed, let the mixer do it's thing. You will notice that part of the sugar looks like it will be stuck to the bottom of the bowl, but a little at a time the dough hook will pick up the sugar, and eventually incorporate all of the sugar into the dough. At that point, is when I transferred the dough onto my silicone mat and kneaded the last 1 cup of sugar into the dough by hand. It turned out so smooth and perfect after letting it set overnight, and no air bubbles whatsoever. I'm wondering now what would happen if I kneaded the final cup of sugar with the dough hook instead of by hand... I was always afraid to do that before because the dough gets so stiff, but with this pro model, I may be able to do the entire kneading with the mixer. It would sure save time. I will try next week with my next wedding cake. 

Just for the record, I now have 4 KitchenAid mixers plus my other KitchenAid appliances, and we just bought a classic KA mixer for my oldest son's family for Christmas. Both of my other children have KA mixers. I should have a share in the company.

Here is a picture of the cute shower cake I did today...just so happened that the shower was postponed until next weekend because of inclement weather, so we packaged it up for the customer to put in the freezer until then.


Monday, June 6, 2011

Cute pink and white wedding cake...

This cute little cake was for a bride that loves pink. The wedding reception was on Sunday, so I delivered it Saturday night to the groom's parents' home, and they transported it to the reception site on Sunday, and arranged the flowers on top.   I made sure that I stabilized it with a wooden dowel going down the center of all 3 tiers. The cake was lemon with raspberry filling. Because it was decorated with fondant, and had a filling that did not need to be refrigerated, I knew they would be fine in transporting it, even though they were a little nervous. As you can see, it arrived safely. I airbrushed the fondant pieces with pink and pearl airbrush colors, which made the pieces glisten. My new airbrush works great with the thicker colors like the pearl and the metallics.


Friday, May 6, 2011

"Tweaked" marshmallow fondant recipe

Now that I've been making marshmallow fondant for some time, I've tweaked the recipe, and it comes out perfect every time. Of course, if you're new at making fondant, it will take a little practice like anything else. A couple of things I really like about marshmallow fondant is that you can basically add any flavor you want to it while the marshmallows are in the "soupy" stage, and I love the easy handling of the fondant because of the elasticity of the marshmallows. I have tried several "ready to use" fondants, and I always go back to using the marshmallow fondant.

Marshmallow Fondant Recipe
1 lb. mini marshmallows (use a good brand, and make sure they are fresh)
2 T. water
2 tsp. corn syrup
flavoring
5-6 cups sifted powdered sugar
Crisco


Pour marshmallows into a large microwave safe bowl. Add the 2 T. of water and mix. Heat on high for 40 seconds, stir and heat again for 40 seconds, stir one more time and heat another 40 seconds. Stir well, and add desired flavoring and 2 tsp. corn syrup. This mixture will be "soupy." Add 1 cup of the powdered sugar and stir well. In the meantime, measure out 4 cups of sugar onto a well greased surface. I have a silicone mat that works really well, but any surface will do. Make a well in the center to pour marshmallow mixture into. With a greased scraper, scrape the marshmallow mixture out of the bowl into the "sugar well." Grease hands generously and knead in the powdered sugar completely, scraping the surface as necessary, and adding more Crisco to your hands if it becomes sticky. Continue to knead until very smooth and elastic. You know you have added enough sugar if your fondant does not spread when you let it set for a few seconds. It will depend on the humidity...you will need to add more sugar if you are in a humid climate. I never add more than 5 cups total because we are in a very dry area. Once your fondant is done, coat the entire fondant with a layer of Crisco and then put it in a zip-lock bag and let it rest at room temperature overnight. When you are ready to roll it out, put it in the microwave for a few seconds to soften it. (I usually do it for about 20 sec., but it will depend on your microwave.) Knead it a little to make it pliable, and then roll it out on a lightly greased silicone mat. The reason I love the silicone mats is because the fondant will stick to the mat until you peel it off. This makes it easier to get the correct placement on your cake and you can also roll it out thinner without it tearing. Some decorators roll fondant out with cornstarch if they don't have a mat, but that tends to dry out your fondant. If you use this method, you will just want to drape it over the rolling pin and then position it on your cake. Before you put the fondant on your cake, be sure to have a good layer of buttercream frosting so the fondant will adhere to the cake. Smooth the fondant out carefully with hands, cut off excess with a pizza cutter, and then smooth again. Again, remove any excess around bottom. You can also use a fondant smoother, but I prefer the control and feel of using my hands. 

Chocolate Marshmallow Fondant
1 lb. mini marshmallows
2 T. water
2 tsp. corn syrup
1/4 - 1/2 cup baking cocoa (regular for rich brown, special dark for dark brown)
4-5 cups sifted powdered sugar
Crisco


Follow the directions for the regular marshmallow fondant, except mix in 1/4 cup cocoa along with the corn syrup. Mix 1 cup sugar into marshmallow/cocoa mixture and then pour into remaining 3 cups of sugar. After completely mixed and kneaded, coat with Crisco and let rest overnight. At this point, your fondant will be a medium brown color. The next day when ready to use, soften your fondant in the microwave, and then you will want to grease your surface well, and add about another 1/4 cup cocoa (a little at a time) with very well-greased hands and knead it in until smooth and shiny, and desired color. Keep adding Crisco to your hands to work in the excess cocoa. 

Marshmallow fondant...very smooth and easy to handle
Chocolate fondant...my favorite...smooth and shiny...almost resembles chocolate ganache...tastes like a tootsie roll


Monday, April 18, 2011

USAFA Bridal Faire...

After some mis-communications and not being able to participate last year, I was able to have a booth at this year's Bridal Faire at the Air Force Academy. I prepared most of the week (amid a house full of visiting grandchildren), and then set up on Friday morning. The event took place on Saturday between 10 and 3. I felt that it was successful and got some good contacts and leads, both prospective brides and vendors that will hopefully refer me. I was able to experiment some more with SugarVeil, which seemed to be very interesting to several visitors. Overall, a successful and hopefully profitable day...

My friend Nancy and I at our booth, getting ready for the Bridal Faire to begin.
Background display for booth, set up day before
Display cake
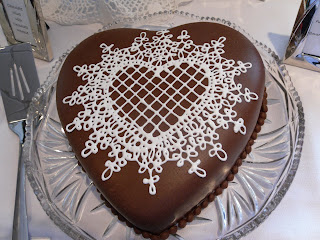
Display cake with SugarVeil lace over chocolate fondant. Lace made in SugarVeil silicone mat

3 out of 6 of sample cakes to taste...
SugarVeil heart piped on greased parchment over printed design...placed on chocolate fondant.
Cake was fudge marble with Bavarian Creme.
Chocolate mint with chocolate mint mousse and vanilla fondant.
Strawberry shortcake...yellow cake with whipped cream and fresh strawberries. Tried new Chantilly whipped cream stabilizer which worked like a charm...whipped cream held up through entire show.

Saturday, July 25, 2009

Fondant Ribbon Cake...Learning new techniques


Even though this looks like a very simple cake, it gave me the opportunity to learn several new techniques, while at the same time tweaking my fondant recipe and techniques. I'll share some of what I learned. I learned allot by reading Janelle Smith's blogs and studying some of the tutorials that she had listed. First of all, I learned that it is easier to put fondant on a chilled cake. Janelle suggests filling and icing the cake and chilling it for a couple of hours. Then take it out of the refrigerator and spritz it with a little water, cover it with the fondant and chill it again. Take it out of the refrigerator a couple of hours before serving it. It will glisten a little from the condensation, but it is OK. This is especially good when you have a filling that needs to be kept cool. This particular cake was fudge marble with chocolate mousse filling. I also purchased a fondant smoother, which I liked using better than only my hand to smooth.

Making the fondant ribbon and bow was definitely an experiment. For the color I used used a shrimp color luster dust mixed with a little vodka (yes, I know you're thinking I went to a liquor store). Actually, I had the bride get me one of those little mini bottles of vodka because I told her that I would feel uncomfortable purchasing it myself. She was OK with that. Carol, at the local cake store where I get some of my supplies, showed me how you can intensify the color of the luster dusts by adding a clear alcohol, such as vodka. You use alcohol because it dries quickly. Anyway, after combining the luster dust with the vodka, I sprayed the fondant ribbon and bows with my airbrush. It gave it the pretty shiny finish I wanted. I had to add lots more sugar and a little meringue powder to the fondant dough to make the bows stiff enough. I think next time I make the bows I would maybe use gum paste instead of fondant, but the ribbon was OK. To make the blush color of the fondant that I covered the cake with, I added several drops of flesh airbrush color to the melted marshmallow mixture before adding the powdered sugar.

The bride furnished the round silver pieces that we used in the center of the bows. I still haven't gotten used to the idea of a finished wedding cake not having anything on top, but it was the look the bride wanted.

Here is the new fondant recipe I used from Janelle's blog. Just make sure you add enough sugar, make it the night before so it can firm up, and that you use plenty of cornstarch when rolling it out.


Marshmallow Fondant

1 bag mini marshmallows (16 oz.)
2 TBS water
2 tsp. corn syrup
5 to 5 1/2 cups powdered sugar
1/4 cup shortening

Combine marshmallows and water in a glass bowl. Microwave for about 40 seconds at a time stirring in between until it becomes a soupy mixture. Stir in corn syrup. Mix in about a cup of powdered sugar. Pour mixture on work surface covered with about 3 cups powdered sugar and knead like bread dough. Coat hands with shortening frequently. Gradually add more powdered sugar as needed until the fondant is smooth and doesn't spread much when you let it sit for a few seconds. Careful not to add too much sugar or the fondant will be crumbly and hard. It's better to make it too soft. Wrap well with plastic wrap and let the fondant firm up overnight before using. If the fondant is stiff the next day, microwave it a few seconds to warm it up and make it more pliable.


Chocolate Fondant

1 bag mini marshmallows (16 oz.)
2 TBS water
2 tsp. corn syrup
4 to 5 cups powdered sugar
1/4 cup shortening
a little less than 1/4 cup cocoa powder

After melting your marshmallows and water, stir in corn syrup and cocoa powder. To achieve a rich brown color, use Dutch Process cocoa. Hershey's makes some called Special Dark. Using regular cocoa will make a soft brown color. Knead mixture into powdered sugar. You'll need less sugar since the cocoa powder absorbs moisture so careful how much you add. Better to make it too soft since you can add more sugar the next day if needed. Wrap well with plastic wrap and let rest overnight.
*Do not add melted chocolate to the fondant. It will seize up and become a crumbled mess.

Saturday, May 23, 2009

Delivering cakes in the rain...


Yesterday we catered a wedding reception for a friend of ours. It was supposed to be an outdoors reception, but, as we know, the weather here in Colorado Springs can be very unpredictable. So, at the last moment, it was decided to bring the reception inside the house. Diane has a very lovely large home, so it wasn't the end of the world, even though she had planned some beautiful decorations for outside. So anyway, we were late getting everything set up since it was a last minute decision. Everything turned out fine, except delivering cakes in the rain is not fun, and because it was raining when Bruce was bringing the cake in, the beautiful finish on the fondant was marred slightly by the rain drops. The cake was still very nice and, of course, tasted wonderful. We used a beautiful orchid spray on the top tier, and it was placed on a mirror and my newly purchased silver cake plateau, which was perfect for this type of cake design. The bride and groom chose some wonderful flavor combinations. . . chocolate mint with chocolate mint mousse, chocolate with peanut butter mousse, and fudge marble with cream cheese. The picture actually makes the cake look smaller than it was. . . the bottom tier was a 14 inch square and the cake plateau was 22 inches in diameter.

Saturday, February 14, 2009

Valentine's Day Wedding Cake


I did an interesting cake today for a Valentine's wedding. Actually, the bride and groom were already married, but renewing their vows. The cake was interesting because all of the decorations were done in fondant, even the borders. The hearts were all done free hand by rolling strips of fondant and then just forming them into different size hearts and putting them randomly on the background fondant, which, by the way, sticks together with just a little water. The bride also had beautiful roses to put on the cake, which finished it off perfectly. She had sent me a picture of this cake that she found on-line and asked me to duplicate it. I think it turned out pretty well for being the first time doing a cake with these kind of decorations. I always enjoy new challenges.


Friday, February 22, 2008

Which icing do you prefer?

When considering icing for your wedding cake, you normally have three options:
  • Buttercream
  • Whipped Cream
  • Fondant

Cream cheese frosting is not really an option here, as it will not hold its shape well enough to decorate with.

Buttercream icing is my preferred choice. It holds up well in most temperatures, is easy to work with, especially when creating details, it tastes great, and is easy to cut and serve. It also tints well, with paste color, or airbrush.

Whipped cream icings can be made with a stabilized whipped cream or a non-dairy whipped topping. It is easy to spread on the cake, and makes for a smooth finish. Some customers like it better because it is not as sweet as the buttercream and has a lighter texture. It is difficult to do detail work with whipped cream icing; it should mainly be used for borders. It also needs to stay cool, so it should not be left for long periods without refrigeration. It too is easy to cut and serve, but does not always tint well.

Fondant is quickly becoming the icing of choice for wedding cakes. It gives that smooth porcelain finish that looks great in pictures and holds up well in most temperatures, but it does have several negatives. It is more difficult to work with; therefore it usually costs more. It can also be difficult to cut and serve. The traditional fondant tastes pretty nasty. I have found a fondant recipe, made with marshmallows, that is much easier to work with, tastes much better, and is a little easier to cut. The fondant is rolled out (like pie dough) and carefully placed over the cake which has been frosted with a generous layer of buttercream. So, if your guests still don't like the taste of this fondant, they can always peel it off and still have the delicious buttercream underneath. Fondant covered cakes should not be refrigerated if you want to keep their "perfect" finish.