Monday, June 20, 2011

Chantilly Whipped Cream Stabilizer

Couldn't remember whether or not I put a post about this yet...apparently, I took pictures, but never wrote a post. Anyway, the dilemma of using whipped cream to ice cakes...especially wedding cakes. I have always used a non-dairy whipped topping base, along with the whipping cream...2 parts base to 1 part whipping cream. Over the years, I have used several different brands...Pastry Pride when we lived in AZ, Rich's whipped topping when I had a supplier here in the Springs, and then another brand that I purchased frozen from Cake Crafts in Denver. Never liked it quite as much because it tended to leave a funny aftertaste. So, after doing some research online, I found good reviews about a product called Chantilly Whipped Cream Stabilizer. It is in a powdered form that I add to 100% heavy whipping cream, along with a little powdered sugar and clear vanilla. Works like a charm, tastes great, icing smooths on really great, and the icing holds up well. No more funny aftertaste. A little pricey, but worth it to be able to just have it on the shelf and not have to keep it frozen. It is basically a gelatin-based product. Yes, I could probably cook up my own gelatin to add to whipping cream, but sometimes time is of the essence when decorating, and it's just nice to have a product I can just add to the cream and whip up. Yesterday, along with the wedding cake, I also had an order for a chocolate mint cake, with chocolate mint mousse filling, iced in chocolate whipped cream...so I added a small amount of cocoa powder, along with a bit more powdered sugar to sweeten, and it turned out great.


And the wedding cake...

Whipped cream and fresh flowers...a great combination

I love fresh flowers on wedding cakes. I also love purple on wedding cakes...it's a very bold, beautiful, and striking color. So I designed this wedding cake for a bride yesterday...the flowers were beautiful. Lilies were a bit large, so I had to put on a few more flowers than I believe she wanted to balance out the size, but overall, I think the finished product was quite stunning. The cake flavors were lemon with cream cheese and lemon fillings, fudge marble with Bavarian Creme filling, and yellow with whipped cream and fresh strawberries. Used the Chantilly whipped cream stabilizer to whip up the cream to ice the cake.


Father's Day and Cookies...

I have friends who happen to love my sugar cookies. Here's a cute idea. Sheila ordered 2 dozen sugar cookies for her husband, so we put on them the names that he goes by. Happy Father's Day, Kim...hope you enjoy the cookies!


Sunday, June 12, 2011

Don't care for cake, then have a cookie for your wedding...

So, a bride called me about a week and a half ago and asked me if I could do a chocolate chip cookie instead of a cake for her wedding. She still wanted it tiered, but a cookie instead of a cake. The order was for a 6 inch, 10 inch, and 12 cookie, not too much icing, but still super pretty. She gave me wording that she wanted on each cookie and decided to rent my pedestals to display them on. Her colors were silver, green, and lilac. The topper she made was a bit too large for the 6 inch cookie, but I put it on anyway. Here's the clincher...I delivered these to the Glow Golf place at the Citidel Mall, which is of course dark, so you couldn't really see the cookies anyway. I got a picture only because I used my flash. Like they say..."different strokes for different folks!"


Saturday, June 11, 2011

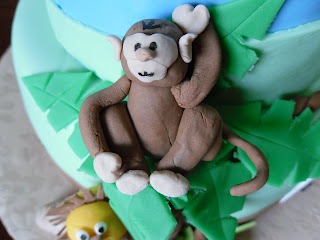
Still learning...

This was a fun new learning experience for me...gumpaste animals for a cute baby shower cake...still much room for improvement, but fun to do...took me back to younger years playing with clay.


Tuesday, June 7, 2011

Making an abstract design for a wedding cake...

The bride and groom sent me a picture of this wedding cake with an abstract design. They wanted this design with fresh yellow daisies in place of the butterflies (which I thought made more sense), and yellow in place of the turquoise on white fondant.


So, I got out my styrofoam cake dummy, some paper, and some pins, and began drawing patterns. 

Here is the final product...the black is made from Hershey's Special Dark cocoa, and the dots are done with Sugar Veil...which gives you a perfectly rounded dot without a point. The beaded borders are done with a blue silicone fondant mold.


The mother of the groom owns a glass blowing store in Manitou and she made the perfect cake top for this abstract design.
Thank you, Liz and Eric, for letting me be a part of your special day.

Using Kitchen Aid mixer to make marshmallow fondant...

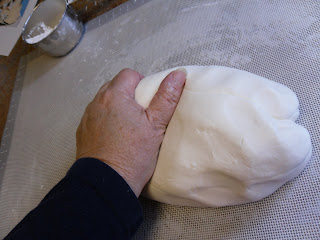
The last time I made marshmallow fondant, I used my Kitchen Aid mixer for mixing most of the sugar in, since I wanted to save time, and then just added a bit more sugar while kneading it on my silicone mat. It worked well, except the one thing you have to make sure of is that you add enough sugar and knead it long enough, or you will have air bubbles in your fondant when you roll it out. I have found out, that you can add more sifted sugar and knead it longer after you have let it set overnight. This way, you will have a nicer finish to your fondant. Click on this link for the complete fondant recipe:
http://cakeideas.blogspot.com/2011/05/tweaked-marshmallow-fondant-recipe.html

Making marshmallow fondant

Melt mini marshmallows with water in microwave at 40 second increments, stirring after each.
When marshmallows are completely melted, add the corn syrup and flavoring. The mixture will look very soupy at this stage.
Sift powdered sugar into Kitchen Aid bowl. I use a simple metal strainer...works better than a sifter.

Pour melted marshmallow mixture into Kitchen Aid bowl with sugar.
Use dough hook on low speed to mix fondant mixture.
This is the consistency it should be when you are done mixing.
Scrape the fondant mixture out of the bowl with a plastic scraper onto a greased silicone mat.
Dust with sifted powdered sugar and begin kneading.
Knead until you have a smooth and elastic ball and the fondant no longer spreads as it sets.

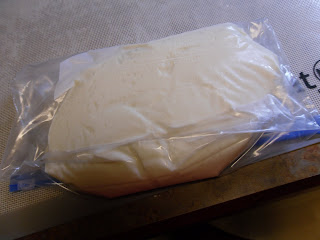
Cover with Crisco and store in ziploc bag to rest overnight.
This is some black fondant made with Hershey's Special Dark cocoa.


Cutting characters with Cricut Cake using Homemade Gumpaste

I recently acquired a recipe for homemade gumpaste which I have been really happy with. Not only is it far less expensive than the pre-made stuff you purchase in the store, I think it is much easier to work with...softer and more pliable. The first time I used it, I thought it might be too soft to used with my Cricut, but it worked like a dream. I will take you step by step through the process of cutting and assembling the pieces after giving you the recipe, so you can try it yourself. This recipe is courtesy of Carrie's Cakes. 


Homemade Gumpaste Recipe
(courtesy of Carrie's Cakes)

(2) pkgs unflavored gelatin (2 Tbsp)
1/2 cup cold water
1 tsp lemon juice

In small saucepan, add water and lemon juice. Sprinkle gelatin on top of water. Allow to soften until water is absorbed, about 5 minutes. Begin to heat gelatin gently. Stir until gelatin is a dissolved clear liquid. DO NOT ALLOW TO BOIL!  Turn off heat.

Add:

2-3 Tbsp. melted vegetable shortening
1/3 cup white corn syrup

Stir to combine thoroughly. Next place 2 lbs. powdered sugar (reserving about 1 cup) in a large mixer bowl. Add the gelatin/corn syrup liquid to the powdered sugar and mix well. Stop mixer, add 2 1/2 - 3 Tbsp. Tylose powder. Continue to mix until thoroughly combined and mixture thickens. Pour mixture onto lightly greased surface, which has been lightly dusted with powdered sugar. With lightly greased hands, knead until it forms a smooth rubbery ball. Add additional sugar if dough is too sticky or soft. Knead in as much sugar as necessary. Beginners usually make it too soft. Wrap tightly in plastic wrap twice. Store in gallon-sized ziploc bag. Allow to rest overnight. Can be stored @ room temperature for weeks. Refrigerate or freeze for extended storage time. This recipe works very well with the Cricut Cake electronic cutter.

Preparing and Cutting Gumpaste 

Roll out enough gumpaste for your cutting mat onto a silicone mat.
You know you have it thin enough when you can see the wording through the gumpaste. Roll it out a bit larger than your cutting mat.
I spread a light coat of high ratio shortening onto the Cricut cutting mat with a silicone pastry brush...you need enough so that your gumpaste with adhere without slipping or pulling up when cutting.
Peel off the gumpaste from your silicone mat and place carefully onto your cutting mat.
Gently use your rolling pin to roll onto your cutting mat, making sure that you get all of the air bubbles out.
Trim off excess gumpaste with pizza wheel, making sure that you trim off enough on the sides where the rollers will go.
Pull off excess gumpaste and save for next project.
This is what your cutting mat should look like after trimming.
This is the picture that I used to make my pattern.
Using my "Make the Cut" program (which is no longer available for use on the Cricut cutters), I layered the pieces on the virtual cutting mat on my computer before cutting them out.
Feeding the cutting mat into the Cricut...
Here is my Cricut cutting out the pieces...I usually use the medium speed.
This is what the pieces look like after being cut out.
I next airbrushed the pieces with my Fat Daddio airbrush, which I happen to love.
Here is my motorcycle guy after I have assembled all the pieces. The pieces stick together with just a tiny bit of water. I use a small paint brush to brush on the water.
Here is the finished cake. I was able to put the finished piece on a cake with whipped cream frosting, which I was never able to put a detailed pattern on before. 

Happy Cricut cutting!