Wednesday, October 30, 2013

Lots and lots of cookies!

This was one of those weekends that really made me appreciate the new double oven. I had a catering order for a cookie and punch reception for 100 people on Saturday night. That meant baking 17 dozen cookies on Saturday, after decorating a cake that morning. So I baked a variety of the large bakery style cookies... all my faves... marbles, snickerdoodles, peanut butter chocolate chip, and oatmeal coconut with cranberries, pecans, and dark chocolate chips (these went fast!). Anyway, however you look at it, that's alot of cookies! My kitchen looked like a little cookie factory for sure, and the house smelled heavenly for about 2 days afterwards. A side note... I was very proud of myself for staying on track with my Weight Watchers program... all those cookies and I didn't get into any. That's a first I think. Miracles do happen!

First of the cookies ready for the serving table

Tuesday, October 29, 2013

Wedding cake or party cake?

So, if you are a big superhero fan, why not have a superhero party for your wedding reception? That's exactly what this bride and groom did, and the wedding cake reflected the rest of the decorations. Here is the cake with logos from their 4 favorite superheros... Deadpool, Green Lantern, Captain America, and Batman. The logos and side decorations were all cut out with my Cricut Cake. The most time consuming part, other than coloring and assembling the pieces, was putting all of the little windows around the four sides of the 14 inch square Batman tier. The top and bottom tiers were covered with dark chocolate fondant. I must say that this was the most unique wedding cake I have ever designed. 


Newest Additions to Kitchen

So when I replaced my old oven with the new double oven, I lost the storage space I had in the bottom drawer. Don't get me wrong, I was glad to exchange storage space for a second oven. It's just that now I needed somewhere to put all that stuff that I had stored there. Hubby to the resue, after daughter having a brilliant idea. I had two fake drawer fronts under my counter that we decided to turn into "real" usable drawers... perfect size for the items I needed to store plus extra space. Then we also put flip out drawers for my kitchen sink goodies under the sink. I love being organized and the extra bit of space I acquired. Thanks to my hubby for sacrificing some of his extra time to help me out. A side note... I found a new home for my "old faithful" oven. My old oven still worked well, it was just old, and I needed the room in a double oven. I was hoping to find a good home for it, and yesterday I was able to give it to a sweet young mother from our church. So glad someone will be able to use it. 


Monday, October 21, 2013

Autumn and Fall Leaves

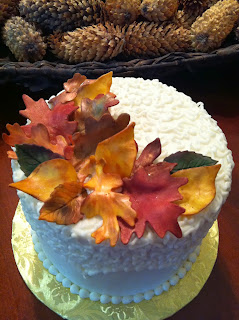
Oh, how I love the fall... the crispness in the air, the fall colors, and the leaves changing! One thing I always missed about living in Arizona was all the beautiful fall leaves... it just didn't happen. Being in Colorado, I look forward to this season every year. I designed a couple of pretty little cakes with fall leaves this year. I had lots of fun shading the leaves to look like something Mother Nature would do. Some of the leaves were modeled from modeling chocolate, others were part modeling chocolate and part gumpaste. I started with ivory color for some, and yellow for others. I think I liked the yellow ones the best. There are all shades of petal dusts and luster dusts to shade with. Just pick out ones that you think would best reflect what you see in nature. Some of my favorite are spiced pumpkin, mahogany, old gold, forest green, red velvet, and brown. One hint-make sure you get the kind that are "non-toxic" if you plan on eating the leaves. :) Roll your gumpaste/modeling chocolate out thin, but still thick enough to show the veins after using the veining tool. You can also use the back side of a real leaf as a veining tool. I found this out after I had made mine and I wish I would have used  this method instead, as some of my veins disappeared when I thinned out the edges. Let your leaves dry on pieces of crumpled up foil, so they have more of a realistic look and movement. You need to let them dry at least overnight, so that when you shade them, they won't fall apart. Then just be creative! This is the fun part... just use straight colors or blend them. I just use the same soft brush for all the colors. So much fun to be creative with your decorating! That's one reason I love cake decorating.

 Use crumpled foil to dry on

Be creative with your colors
 Simple little 6 inch anniversary cake
 8 inch birthday cake...I added some pine cones to this one

Here is a great little tutorial on making gumpaste leaves. Thanks to Alice Currah for sharing it.  Fall leaf tutorial