Showing posts with label baby shower cakes. Show all posts

Tuesday, July 24, 2012

Modeling Chocolate Recipe

PLEASE SEE UPDATE AT BOTTOM OF POST.

Modeling chocolate (or candy clay) is an easy and fun medium to use when decorating cakes. You can use it in candy molds, use it like regular clay to mold figures free hand, or you can use it in combination with fondant or gumpaste (50/50) to give the fondant better stability and flavor, and then use it for anything that you would use gumpaste for. It can be made with real chocolate or with candy melts. The tutorial that I'm posting today is made with candy melts. You can use dark chocolate, milk chocolate, white chocolate, or any other color.

12 oz. package Wilton candy melts (you can use any brand-just make sure you measure out 12 oz.)
1/4 cup light corn syrup

Pour candy melts into microwave safe bowl, and melt according to directions. Each microwave is different as far as power, but it usually takes me 1 1/2 minutes, stirring at 30 sec. intervals, until smooth. 
 Assemble tools and ingredients
 Only 2 ingredients needed - candy melts and corn syrup
 Pour candy melts into microwave safe bowl
 Stir after 30 seconds
 Stir again after 60 seconds
Final stir after 90 seconds - candy melts should be smooth

To allow corn syrup to pour out of measuring cup easily, coat the inside of the cup with vegetable oil spray. Measure 1/4 cup light corn syrup (any brand will do), and pour into melted candy melts. Mixture will begin to firm up immediately. Continue to stir until completely incorporated and mixture has formed a ball. Pour onto wax paper and allow to cool. When cool, put in zip-lock bag and allow to set over night at room temperature. When ready to use, take off a small piece, color as desired with food safe colors, and knead in your hands, until color is fully incorporated, and chocolate is pliable. Mold into desired shapes. 
 Use vegetable oil spray to coat inside of measuring cup
 Corn syrup will pour out of cup easier when coated
 Add corn syrup to melted candy melts
 Stir until fully combined and formed into ball
 Place on wax paper to cool
When cool, place in bag to cool at room temperature overnight

Here are a few examples of cakes items I have modeled with modeling chocolate...

 Hat, boots, and belt molded from modeling chocolate

 Booties made from 50/50 fondant and modeling chocolate
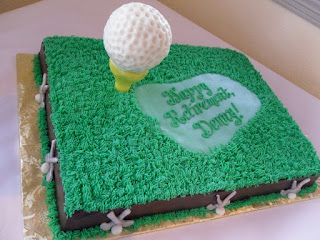
 Golf ball and tee molded from rice krispie treats and covered with modeling chocolate
Rope heart, garlands, hat, and horseshoes molded from modeling chocolate

UPDATE FOR MODELING CHOCOLATE RECIPE (DECEMBER 2016)

After making and using and loving modeling chocolate for many years, here are some tips that will help to make your recipe for modeling chocolate easier and almost fool proof:

1) My favorite brand of chocolate to use is Ghirardelli melting wafers, both white and dark chocolate. Use 1/2 cup corn syrup per lb. of wafers. 
2) If using colored candy melts, use 1/3 cup corn syrup per lb. of candy melts.
3) Be sure not to overheat your chocolate. It's best to stir the last few wafers until melted, instead of keep heating them up. 
4) Warm your corn syrup for a few seconds, so that both the syrup and chocolate are same temperature... just barely warm to the touch. 
5) If you need to color an entire batch, add the paste color to the corn syrup, stir, then add to the melted chocolate. 
6) Make sure all chocolate is incorporated without over-stirring.
7) Spread out chocolate mixture very thinly between layers of plastic wrap, and let set for no longer than 1 hour. When it is set, but still pliable, knead it into a smooth ball or log. Wrap tightly, put in zip lock bag, and let set until firm. It can usually be used in about 2 hours if necessary.
8) The modeling chocolate will be very hard. When you need to use a piece, you can put it in the microwave for no longer than 5 seconds to soften just a bit.  

More examples of modeling chocolate


Wednesday, May 2, 2012

Here's a sweet little tip ...

I saw on Pinterest awhile back how someone had used push pins to elevate something they were painting so that the bottom side would not touch the surface while it dried. So, when I was doing this baby shower cake last week, I thought, "why not try that with my cake decorating?" So when I was covering these cute little baby blocks, after I piped the icing on the bottom of the rice krispie blocks, I put 4 push pins in the bottom, and then decorated the rest of the blocks ... perfect. I left them there until I was ready to assemble the cake. 


Sunday, April 8, 2012

I finally have all my ducks in a row!

Look at this... all the little duckies in a row on this fun baby shower cake...


The awesome customer that I did this cake for went to the Ducky Shop in Manitou (I didn't even know that one existed) and got these 8 little baby duckies to use on the cake, then sent me a picture of a "ducky" cake. She gave me my decorator's free license to design the cake I wanted, and this is what I came up with. 
I had lots of fun making mama ducky out of rice krispie treats...
and learning how to make gelatin bubbles...


Click here for a link to the tutorial for making gelatin bubbles.
and making pearlized fondant ball "bubbles"
My customer, Jeanene, called after the shower to let me know that the cake was a huge hit and that it tasted wonderful (fudge marble with chocolate mousse filling). One of the greatest joys of being a cake decorator is hearing positive feedback from your customers. Thanks Jeanene.

Wednesday, December 7, 2011

And you thought I was on vacation...

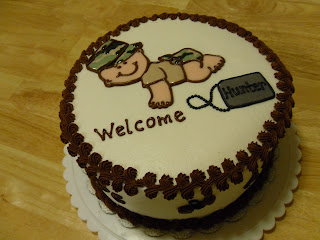
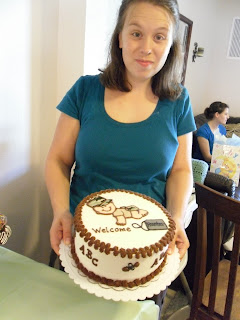
In November I was in Hawaii, visiting my daughter after the birth of third baby...little Hunter Owen. While there I played maid, nanny, grandma, mom, and of course, cake decorator. I was able to attend Hunter's baby shower while there and this is the cake that we came up with...

Dad is in the Air Force, hence the little camo outfit and dog tag. We had extra cake, so we made a few cake pops for the kids also. I used the buttercream flow-in method for the design, and chocolate buttercream for outlining and trim. I grabbed one of dad's hats to use as a sample for the camouflage pattern.
Here is a picture of little Hunter in his Hawaiian outfit that mom made for him...


Saturday, December 3, 2011

I love my new KitchenAid!!


I know, you're probably saying "she bought another KitchenAid?" Well, I have had my other ones for an eternity and yes, they still work, but...this one was on sale at Costco for $50 off...and it's a professional model, so it's more heavy duty...and it has a larger, wider bowl...and it matches my KitchenAid food processor and my KitchenAid blender...and I used my cake money...and I think I deserved it...and, and, and... Anyway, I absolutely love it! It's very easy to work with, and the speeds start out very slow, especially compared to my old ones, which really means less mess. 

So I needed to make a batch of fondant last night for a cake I was doing today, so I thought I would check out how the new mixer would handle the job...oh wow! It was perfect! I first slightly greased the bowl, then put in 5 cups of sifted powdered sugar. I poured in the melted marshmallow mixture after putting on the heavy duty spiral dough hook, and on a low speed, let the mixer do it's thing. You will notice that part of the sugar looks like it will be stuck to the bottom of the bowl, but a little at a time the dough hook will pick up the sugar, and eventually incorporate all of the sugar into the dough. At that point, is when I transferred the dough onto my silicone mat and kneaded the last 1 cup of sugar into the dough by hand. It turned out so smooth and perfect after letting it set overnight, and no air bubbles whatsoever. I'm wondering now what would happen if I kneaded the final cup of sugar with the dough hook instead of by hand... I was always afraid to do that before because the dough gets so stiff, but with this pro model, I may be able to do the entire kneading with the mixer. It would sure save time. I will try next week with my next wedding cake. 

Just for the record, I now have 4 KitchenAid mixers plus my other KitchenAid appliances, and we just bought a classic KA mixer for my oldest son's family for Christmas. Both of my other children have KA mixers. I should have a share in the company.

Here is a picture of the cute shower cake I did today...just so happened that the shower was postponed until next weekend because of inclement weather, so we packaged it up for the customer to put in the freezer until then.


Saturday, June 11, 2011

Still learning...

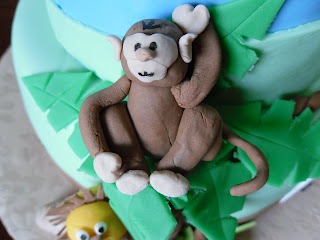
This was a fun new learning experience for me...gumpaste animals for a cute baby shower cake...still much room for improvement, but fun to do...took me back to younger years playing with clay.


Monday, August 17, 2009

Detail work...outlining with buttercream


I was looking at some of my cake pictures recently, comparing some of my more recent cakes with some done several years ago. Even though all were nice, the more recent cakes have much better detail and look nicer. I think what has made the difference is that I now use buttercream to outline, instead of piping gel, as I had many years ago. Often, I use chocolate buttercream, the darkness depending on the pattern I'm working with. I think I have also gotten pickier about being exact with my fill-in and detail work. For example, on this last cake I did for a friend's baby shower, I ended up doing the faces over again, because I was unhappy with the way the eyes looked first time around. Took me forever to decorate, but I was happy with the end result.