Showing posts with label modeling chocolate. Show all posts

Monday, November 20, 2017

Wedding cake ... really?

Every now and then, I will get a request for a very unconventional wedding cake. This cake request was from Kayli and Nathan from Denver. Their wedding was on a Sunday, so since I don't work or deliver on Sundays, Kayli came with 3 of her bridesmaids to pick up the cake. Kayli and Nathan met with me several months ago, and described what they had in mind, and I had cake samples for them to taste. I then had my son, Tom (Disney animator), draw a sketch for me to get a rough idea of what I could design for the cake. The request was a bolder or mountainside with grassy patches and a hammock on top, with the bride and groom. Also, they wanted some succulents on the cake because they really like them. So, here are a few pictures to show the progress of the cake.

 Rough sketch for cake idea.
 Stacked and filled 12, 10, and 8 inch layer cakes with support dowels. In the freezer to chill.
 Carved and shaped cake with crumb coat. Back in freezer to chill.
Final coat of buttercream, and back in freezer to chill before adding modeling chocolate.
 Finished cake. I used crushed edible rocks for the gravel on the trail, and touched up color with petal dust mixed with Everclear.
 Trees and figurines were molded from modeling chocolate, with the bride's dress  and hammock from Flexfrost, edible icing sheets.

Succulents were made from gumpaste. 

It's always a challenge and takes longer than anticipated to do a new design. But the bride and groom were happy with the results, so I'm good with that. 

Monday, April 20, 2015

Having fun with molds and modeling chocolate!

A month or so ago, I secured an order for an "under the sea" quinceanera cake and cupcakes, coming up in June. The mom gave me a few pictures, but has pretty much given me free reign on the design. So anyway, I have been experimenting on using silicone molds- both ones I have purchased and ones I have made myself. 

By far, my most favorite silicone molds are ones from First Impression. Some of them are quite pricey, but worth it, if it's something you really need. I have gotten a couple of molds from them that I don't like. They are usually the ones that are very shallow. But, with only a couple of exceptions, First Impression molds are super! 


Recently, I have found a product to make my own silicone molds. It's called Amazing Mold Putty. It's a 2-part material that you blend together, and after a few minutes, it sets up. As long as I have an original of something I want to mold, this is great stuff. You can either buy it online, or at Michael's or Hobby Lobby. It costs about $20, but I wait until I have a 40 or 50 percent off coupon and use that. 


My favorite medium to use with these silicone molds is modeling chocolate. Click here for the recipe. I also use the ratio of 1 lb. of chocolate to 1/2 cup corn syrup when using Ghirardelli chocolate (my favorite). I like using modeling chocolate because it's easy to push into the molds, then you can plop it into the freezer for a few minutes, and it hardens really nicely so you can remove it from the mold. It's really fun to work with! So let me share with you a few things I've been working on. 

 I haven't painted any of these yet, but already they look amazing! 
 The detail is incredible!
 I tried making my own sand dollar mold, but it just didn't work out. This one is amazing!
 I love this! I added a little dark chocolate to white chocolate and the color already is pretty nice.
More coral... I'm so excited to use these on my cake!

Here are some of the molds I have made myself with the Amazing Mold Putty...


 Original starfish

Starfish made from modeling chocolate

Saturday, March 29, 2014

Making Carissa's "Frozen" Cake


What little girl is not in love with Disney's "Frozen" right now? My granddaughter Carissa turned 5 today. One of her gifts from Mom and Dad was the "Frozen" DVD, so I decided to make her a "Frozen" cake with Olaf as the central figure. I started making the pieces a couple of days ahead, and assembled everything this afternoon. The flavor was vanilla with fresh strawberries and strawberry mousse. I didn't want to refrigerate it because of the fondant and isomalt pieces, so I assembled it just before we needed it.

First of all, what winter cake is complete without snowflakes? I had a few left over from Carissa's preschool cupcakes from last week, so used those plus made a few more. White chocolate is perfect for piping snowflakes. Just copy a bunch of snowflakes on regular paper, tape them onto a board and cover with waxed paper. Then just pipe over the patterns and let set up. Very easy. I made a few snowflakes also with a First Impressions blue silicone mold. They were very difficult to make, as the mold is very shallow and intricate. I tried using gumpaste, fondant, modeling chocolate, 1/2 modeling chocolate with 1/2 gumpaste or 1/2 fondant. I tried putting the molded snowflakes in the freezer before unmolding them. Some of them turned out beautifully, but several just fell apart when trying to unmold them. Not the most favorite mold I've used. 


Next I made Olaf. I looked for 3-D pictures online, and then just patterned Olaf after the pictures. He was made from 1/2 modeling chocolate and 1/2 fondant, His arms and hair were piped out of dark chocolate. Pipe plenty extra because most likely you will need them if one breaks while you are assembling him. I also made a few snowballs out of the same 1/2 and 1/2 mixture, and then rolled them in sanding sugar.


Next I made the ice pieces and a few curly cews from isomalt. If you've never used isolmalt, you must try it. The results are amazing. It's not hard to use once you learn how. You can go to the CakePlay website and watch their video tutorials. CakePLay Isomalt To give it a "crinkly" look, I bunched up a piece of aluminum foil, then smoothed it out and sprayed it lightly with cooking spray, then spread the melted isomalt out thinly on the foil. 


I iced the cake with vanilla buttercream and then covered it with blue and white marbled fondant. I love the look of marbled fondant. Here is a good video on how to marble fondant. She also uses "The Mat" to roll out her fondant like I do. How to Tie Dye Fondant

After the fondant was on, I started assembling the pieces on the cake... here's where you can use your creativity. The last thing I did was cut out Carissa's name with my Tappits and white modeling chocolate, and then sprinkled the entire cake with clear edible glitter.

Carissa's reaction to the cake was priceless. She couldn't stop laughing at Olaf! It made all of my work worthwhile. Happy Birthday Carissa!


Saturday, September 14, 2013

Experimenting with modeling chocolate...

You can make some really cool stuff with gumpaste, but when you try eating it, it's not so great. So, I have been playing around with modeling chocolate lately, so you can eat the decorations without them tasting "nasty." The latest cake I experiemented with was a flower basket for a little girl's birthday. Of course they would want to eat the flowers, so instead of making them out of gumpaste, I used modeling chocolate. It is a little tricky to work with, but of course, they will taste yummy. The things that I don't like about making flowers from modeling chocolate is that you can't thin out the petals like you can with gumpaste, so they don't look as realistic as they normally would. Also, I noticed that the airbrush color does not go on as well. I had a problem with it beading up and taking forever to dry, so I guess I will have to stick with other coloring methods. Also, the modeling chocolate has a yellow tint, so the color is not as true as it is with gumpaste. I really like the way the basket turned out. It was made with 1/2 modeling chocolate and 1/2 fondant...still tastes good. I like the way it resembled a real basket. For the handle, I wound the 1/2 and 1/2 combination around a 1/2 inch clear vinyl tubing piece, and then let it dry for a couple of days. To insert it into the cake, I put 2 hollow plastic dowels in the cake and then inserted the ends of the handle into those, which gave it more stability. The vinyl tubing kept the handle from cracking. 

See how the basket looks real
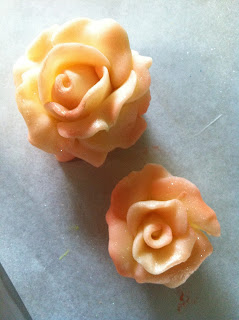
Modeling chocolate roses
Mums from modeling chocolate
Leaves and daisy from modeling chocolate - not bad, but thicker than I like
1/2 chocolate, 1/2 fondant around vinyl tubing-I ended up cutting some off of each end
Allow to dry a few days

Monday, September 9, 2013

Harvest Time!!

For those of you with a sweet tooth, this kind of gardening may be right up your alley. First you have to start with that rich dark soil... crushed Oreos make the perfect "soil." Just put the cookies whole into the food processor and whirl away until you have Oreo dirt. Then model veggies and fruits from 1/2 modeling chocolate/ 1/2 fondant. Use your fondant tool to add details, but mainly just use your imagination and hands to make them into fun veggie and fruit shapes, and then cut out leaves to match each kind, then shade both the veggies and leaves with a little petal dust. Push aside a little of the "soil" on top of each cupcake, so the veggies and fruits will stick to the chocolate buttercream underneath. No need to water or weed this garden. The produce will be gone soon enough.