On Friday I had a cake order for one of my past wedding cake customers. She ordered my chocolate peanut butter cake for her son's birthday. It is chocolate cake with peanut butter mousse and crushed Reese's cups between all 3 layers. The cake is iced in chocolate peanut butter frosting and decorated with more Reese's cups on top...perfect for any chocolate and peanut butter lover...yum!
Sunday, October 31, 2010
Thursday, October 7, 2010
Never on Sunday...
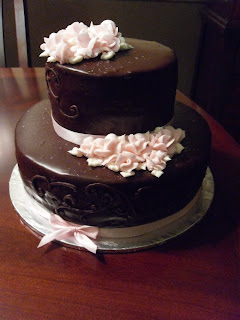
Last Saturday, after I returned home from AZ, I baked and decorated a small 2-tier chocolate ganache wedding cake. I delivered it to the customer's apartment on Saturday evening for her wedding the following day. I normally don't stack tiers together until I get to the delivery site; however, on this small cake, I needed it to be complete when it arrived, and she needed to be able to transport it to the site the following day. The cake had a very stable filling (fudge), and was covered in chocolate ganache, with only ribbon, small buttercream roses and a little scrollwork for decorations. To keep the tiers intact, I used a long wooden dowel, sharpened with a pencil sharpener, and pushed down the center of both tiers.
How to fill a cake
As I was visiting my niece Tiffany in Arizona last week, who is learning how to decorate, she was asking me about the best way to fill a cake, so this blog post is for her, along with anyone else who may be interested. I'll also post a couple of my favorite filling recipes.
First, make sure the cake is thoroughly cooled, not necessarily chilled, just cooled. If I have a wedding cake to deliver on Saturday, I usually bake the cake on Thursday night, decorate on Friday, and deliver on Saturday. I NEVER freeze my cakes. I think it makes a difference in the taste. I chill the cakes when they have fillings or frostings that require refrigeration to stay fresh. I'm using a tiny 6 inch round for my demo, as I had a small 2 tier (6" and 10") chocolate ganache wedding cake last weekend. I have a "cake saw" that I have had for years, but on a small cake such as this, you could also use a long bread knife. I strongly suggest purchasing a cake saw if you start filling larger cakes. Cake saws normally come with adjustable feet. I have taken mine off. Also, because I have been decorating for so long, I can just "eyeball" my measurements. When you are first starting out, you may want to divide the sides of the cake equally with toothpicks as a guide.
Step #1
Trim off any "domed" part of the layer, so that it is flat.
Step #2
Slice the layer in half. It does not have to be perfect.
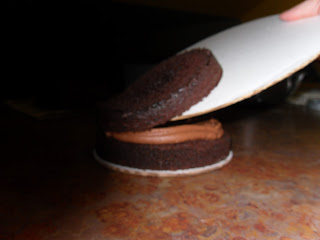
Step #3Slide another slightly larger cake board between the two pieces and carefully lift off.
Leave a small portion of the cake hanging off the side of the cake board, to make putting the layer back on easier. Lay this piece next to the cake, being sure to keep it in the same position as you removed it.
Step #4
Insert a coupler into your decorating bag. Using the coupler only, without a tip, apply an "icing dam" around the edge of the cake, using whatever icing you will be using to ice the outside of the cake (On this cake I used a chocolate buttercream). This will act as a barrier to hold the filling in, and will also keep your cakes level.
Step #5
Spread filling inside icing dam. Do not use fillings that are too runny. You can also combine fillings. Make sure not to go over the top edge of the icing dam. The filling I used for this cake is a fudge filling.
Step #6
Reposition the top layer over the filling, keeping it in the same direction you took it off, and starting with the portion that is hanging off the board.
Step #7
Repeat with next layer, being sure to stack the two layers together with top sides together, after leveling off the top. This will give you a nice flat surface to ice the cake.
Step #7
Gently press down around edges of cake top to ensure that cake is level, and brush off excess crumbs. Ice cake. I usually start with the sides, and then ice the top, and then smooth the entire surface. I will make "icing the cake" the subject of another post.
Here is the finished iced cake that I have positioned on a rack, ready to have chocolate ganache poured over the top.
Fudge Filling
(1) 8 oz. package cream cheese
Approx. 1/3 cup baking cocoa (or more, depending on taste)
1 1/2 - 2 cups powdered sugar
1 tsp. vanilla
Beat cream cheese until soft. Add remaining ingredients and beat until smooth and creamy. To make this into a chocolate mousse, add about 8 -10 oz. whipped topping.
Mousse Filling
(1) 8 oz. package cream cheese
1 1/2 - 2 cups powdered sugar
1 tsp. vanilla
8 - 10 oz. whipped topping
Desired flavor and amount of fruit filling, jam, or other ingredients
Beat cream cheese until soft. Add powdered sugar and vanilla and beat until smooth and creamy. Add whipped topping. Fold in fruit filling or jam. Do not use fresh strawberries, as it will make the mousse go flat and runny. If you are a chocolate and peanut butter fan, try adding peanut butter to this recipe...yum.
Easy Bavarian Creme Filling
8 oz. package cream cheese, softened
2 (3 1/2 oz.) packages vanilla instant pudding
3/4 cup milk
12 oz. Cool Whip, thawed
Mix together dry pudding mix and cream cheese. Slowly beat in milk. Fold in Cool Whip. You may also use other flavors of puddings.
You can also use vanilla or chocolate whipped topping as a filling...or try adding whipped topping under fresh fruit. One of my most requested cakes is a banana split cake...yellow cake with layers of bananas, strawberries, and pineapple, all on top of whipped topping, drizzled with chocolate syrup, and sprinkled with nuts.
Subscribe to:
Posts (Atom)


