Sunday, December 19, 2010

Having way too much fun with my Cricut Cake...

Making holiday sugar cookies was never so much fun. Take a look at these cookies...yummy and very festive...all done with my Cricut Cake. My favorite is Mr. Santa Claus.


Merry Christmas to everyone!

Monday, December 6, 2010

Who says you can't have a chocolate wedding cake...look at this...

We catered a large wedding last weekend and the bride wanted a cake covered in chocolate fondant. The decorations were simple, yet elegant. The bride's mom was originally a little concerned that it wouldn't  look right or match the other decorations, but it was just fine. We substituted some snowflakes on the second tier instead of using the original flower motif. All of the decorations were cut with my Cricut Cake. We used fresh hydrangeas and miniature roses to complete the decorations. We also served 3 other specialty cakes and cheesecake. All of those were eaten, but not much of the wedding cake was gone by the end of the reception. Part of the reason for that was possibly because the cake was not cut until half way through the reception. This is the first wedding cake I have decorated using chocolate fondant. For this one, I used the Hershey's Special Dark cocoa powder.

 All designs cut out with Cricut Cake

Shirley Temple (chocolate and vanilla layers with chocolate mousse and whipped cream with white chocolate shavings), Carrot cake with pecans, and Chocolate Lover's (chocolate layers with fudge filling covered in dark chocolate ganache). Also cheesecake with caramel and raspberry sauce.

Sunday, November 28, 2010

So you want to learn cake decorating...

Years ago as a newlywed and new mom, I took my first cake decorating class from a local cake decorating shop in Glendale, AZ. My teacher was a male...very good at what he did...and it was the Kellar Method of cake decorating, which I'm not sure exists any longer. My goal was to be able to just learn some basic decorating skills so that I could make cakes for my family. It soon became evident that I loved decorating and wanted to learn more, so I took a beginning wedding cake class at the same place. The rest is history. I was able to make my little hobby into a business so that I cold stay home with my children, especially while they were small, which I believe has been a blessing to our family. It has also been a great outlet for my creative juices. Some areas of cake decorating I believe have changed since I took my first classes years ago. For example, I think that more decorators are decorating with fondant now than they used to. After taking my beginning classes, I basically taught myself everything else...and I am still learning new techniques every day. I strongly suggest that if you want to learn cake decorating, that you find someone other than a "Wilton" instructor...find someone that has been decorating for a long time, to teach you. I'm sure that some of my methods are ones that Wilton teaches, but others are not.

That being said, I have a couple of my nieces who are now getting into cake decorating. Even my daughter is finding out that she needs to learn how to decorate (out of necessity, since she now lives far away from mom). In this post, I will share a list of some basic supplies that someone would need to get started. I would not suggest buying a "kit," because there are just some things in those that you don't need, or won't ever use.

BEGINNING CAKE DECORATING SUPPLY LIST
ü  8” round Magic Line or Fat Daddio's cake pans. DO NOT GET WILTON (You will need two to bake a double layer cake.  These pans are a little more expensive, but bake better and will last forever)
ü  If you are getting a 1/4 sheet (9x13), look for the same brand. Pans need to have straight sides (not tapered), and exact corners (not rounded).
ü  Spatulas (1 small and 1 large) I would suggest that the large one be an off-set(angled) spatula...easier to ice cakes with)
ü  Colors – red, blue, green, yellow (The liquid paste or gel colors are best, they are easier to use and last a very long time. Chefmaster and Americolor are good brands and they come in every imaginable color, but you can start with these 4 basic colors)
ü  10” or 12” vinyl decorating bags (2) (Wilton Featherweight bags are good)
ü  Couplers (2)
ü  Flower nail (#7 or larger)
ü  Tips – Nos. 3, 4, 7, 16, 18, 32, 48, 88, 104, 125, 352
ü  Tip brush
ü  Meringue powder
ü  Butter vanilla flavoring


Get good quality cake pans...Magic Line or Fat Daddio are the best. You have to buy these at either a cake decorating supply store or online.


This is an off-set or angled spatula. It is easier to ice cakes with. You can buy these at places like Walmart, JoAnn, Hobby Lobby, kitchen supply stores, or cake decorating supply stores.


Americolor or Chefmaster liquid paste or gel colors are the best to use. These can be purchased at cake decorating supply stores or online.

These are Wilton Featherweight decorating bags...they become softer and easier to use after several uses. You can buy these at places like Walmart, JoAnn, Hobby Lobby, or cake decorating supply stores. 

This is a coupler. It comes in two part...the large portion fits inside the decorating bag and the ring fits over the tip to keep it secured to the bag. The Wilton brand is fine. You can purchase these at places like Walmart, craft stores, or cake decorating supply stores.


This is a flower nail. It is used to make some flowers, although I usually make my roses on a wooden dowel rod. You can purchase these at craft stores or cake decorating supply stores.


These are cake decorating tips...each has a specific number. It is best to get a few individual tips at first until you learn some basic techniques, and decide which ones you really need. There are still some tips that I have never used. I also have several of the same tips because I use them so frequently. Wilton or Ateco are good brands. You can purchase these best at cake decorating supply stores. If you buy them at places like Walmart or craft stores, you sometimes have to buy them in groups that you don't need.

This is a tip brush. It is used to clean frosting out of your decorating tips. These can be purchased at places like Walmart, craft stores, or cake decorating supply stores.


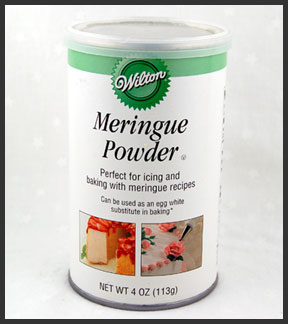
This is meringue powder. Any brand is fine. It is used to make some flowers and other decorations that harden as they dry. This can be purchased at places like Walmart, craft stores, or cake decorating supply stores.


This is butter vanilla flavoring. Again, any brand will work. You usually have to buy this at a cake decorating supply store or online. It is my favorite flavoring to use when making buttercream frostings.


Because there are no decent cake decorating supply stores here in the Springs, I do most of my shopping at Cake Crafts in Denver (a great place!) or online. 

Friday, November 5, 2010

Yummy sugar cookies in honor of election day...

We had a friend whose birthday just happened to fall on election day...so this is what I came up with...the big one for him and the others for some other friends.  Soft and yummy sugar cookies...these are the best...just eat them with a glass of milk or cup of hot chocolate.


The trick to making soft sugar cookies is not rolling them too thin, and not baking them too long.  All cookies should be taken out of the oven when just set, and let finish baking on the cookie sheet. 

Sunday, October 31, 2010

Just for all of you chocolate and peanut butter lovers...

On Friday I had a cake order for one of my past wedding cake customers. She ordered my chocolate peanut butter cake for her son's birthday. It is chocolate cake with peanut butter mousse and crushed Reese's cups between all 3 layers. The cake is iced in chocolate peanut butter frosting and decorated with more Reese's cups on top...perfect for any chocolate and peanut butter lover...yum!


Thursday, October 7, 2010

Never on Sunday...

Last Saturday, after I returned home from AZ, I baked and decorated a small 2-tier chocolate ganache wedding cake. I delivered it to the customer's apartment on Saturday evening for her wedding the following day. I normally don't stack tiers together until I get to the delivery site; however, on this small cake, I needed it to be complete when it arrived, and she needed to be able to transport it to the site the following day. The cake had a very stable filling (fudge), and was covered in chocolate ganache, with only ribbon, small buttercream roses and a little scrollwork for decorations. To keep the tiers intact, I used a long wooden dowel, sharpened with a pencil sharpener, and pushed down the center of both tiers.

How to fill a cake

As I was visiting my niece Tiffany in Arizona last week, who is learning how to decorate, she was asking me about the best way to fill a cake, so this blog post is for her, along with anyone else who may be interested. I'll also post a couple of my favorite filling recipes.
First, make sure the cake is thoroughly cooled, not necessarily chilled, just cooled. If I have a wedding cake to deliver on Saturday, I usually bake the cake on Thursday night, decorate on Friday, and deliver on Saturday. I NEVER freeze my cakes. I think it makes a difference in the taste. I chill the cakes when they have fillings or frostings that require refrigeration to stay fresh. I'm using a tiny 6 inch round for my demo, as I had a small 2 tier (6" and 10") chocolate ganache wedding cake last weekend. I have a "cake saw" that I have had for years, but on a small cake such as this, you could also use a long bread knife. I strongly suggest purchasing a cake saw if you start filling larger cakes. Cake saws normally come with adjustable feet. I have taken mine off. Also, because I have been decorating for so long, I can just "eyeball" my measurements. When you are first starting out, you may want to divide the sides of the cake equally with toothpicks as a guide.
Step #1
Trim off any "domed" part of the layer, so that it is flat.

Step #2
Slice the layer in half. It does not have to be perfect.
Step #3
Slide another slightly larger cake board between the two pieces and carefully lift off.

Leave a small portion of the cake hanging off the side of the cake board, to make putting the layer back on easier. Lay this piece next to the cake, being sure to keep it in the same position as you removed it.
Step #4
Insert a coupler into your decorating bag. Using the coupler only, without a tip, apply an "icing dam" around the edge of the cake, using whatever icing you will be using to ice the outside of the cake (On this cake I used a chocolate buttercream). This will act as a barrier to hold the filling in, and will also keep your cakes level.


Step #5
Spread filling inside icing dam. Do not use fillings that are too runny. You can also combine fillings. Make sure not to go over the top edge of the icing dam. The filling I used for this cake is a fudge filling.

Step #6
Reposition the top layer over the filling, keeping it in the same direction you took it off, and starting with the portion that is hanging off the board.

Step #7
Repeat with next layer, being sure to stack the two layers together with top sides together, after leveling  off the top. This will give you a nice flat surface to ice the cake.


Step #7
Gently press down around edges of cake top to ensure that cake is level, and brush off excess crumbs. Ice cake. I usually start with the sides, and then ice the top, and then smooth the entire surface. I will make "icing the cake" the subject of another post.

Here is the finished iced cake that I have positioned on a rack, ready to have chocolate ganache poured over the top.


Fudge Filling
(1) 8 oz. package cream cheese
Approx. 1/3 cup baking cocoa (or more, depending on taste)
1 1/2 - 2 cups powdered sugar
1 tsp. vanilla


Beat cream cheese until soft. Add remaining ingredients and beat until smooth and creamy. To make this into a chocolate mousse, add about 8 -10 oz. whipped topping.


Mousse Filling
(1) 8 oz. package cream cheese
1 1/2 - 2 cups powdered sugar 
1 tsp. vanilla
8 - 10 oz. whipped topping
Desired flavor and amount of fruit filling, jam, or other ingredients


Beat cream cheese until soft. Add powdered sugar and vanilla and beat until smooth and creamy. Add whipped topping. Fold in fruit filling or jam. Do not use fresh strawberries, as it will make the mousse go flat and runny. If you are a chocolate and peanut butter fan, try adding peanut butter to this recipe...yum.


Easy Bavarian Creme Filling
8 oz. package cream cheese, softened
2 (3 1/2 oz.) packages vanilla instant pudding
3/4 cup milk
12 oz. Cool Whip, thawed

Mix together dry pudding mix and cream cheese. Slowly beat in milk. Fold in Cool Whip. You may also use other flavors of puddings.

You can also use vanilla or chocolate whipped topping as a filling...or try adding whipped topping under fresh fruit. One of my most requested cakes is a banana split cake...yellow cake with layers of bananas, strawberries, and pineapple, all on top of whipped topping, drizzled with chocolate syrup, and sprinkled with nuts. 


Thursday, September 23, 2010

Two flags, two emblems...different materials

Last time I did my Air Force flag cake, it was before I was introduced to the amazing capabilities of SugarVeil . The first flag was made from fondant...looked nice, but was very heavy and hard to place on the cake. I needed to add extra support in the cake so the flag would not crush it. This time, the flag was made from SugarVeil and no extra support was needed. The flag resembled even more closely an actual fabric flag, complete with weight and texture. The colors were also more vivid. The only thing I would have done differently were the stars. I cut them out of gumpaste...they looked great, but had a difficult time sticking to the SugarVeil material. I will be looking for a star punch to cut the stars out of the SugarVeil next time. I'm still having a difficult time using SugarVeil in my Cricut Cake. The SugarVeil pieces just adhered to each other without much problem. I didn't even need to use water. And the flag draped very nicely on the cake...just like an actual fabric flag. 


I used to make all of my Air Force emblems out of royal icing...looked OK, but now even more exact when cut from gumpaste with the Cricut Cake. In the pictures, you can see the differences.


How Awesome Is This!

When I got my new Cricut Cake machine, what I was really hoping to accomplish is to cut out some of my own patterns. Well, now I can do that...I purchased Make the Cut software which lets you cut out anything you want. You just import any pictures from your computer onto a virtual cutting mat, plug your computer into the Cricut Cake with a USB printer cable, and let the machine do the rest. It is truly amazing! Instead of creating my Air Force emblems from royal icing, I can now cut all the pieces out of gumpaste with the Cricut, airbrush them, and stick the pieces together with a little water. It still takes some time, but the design is so much more exact. I'm still experimenting with what food materials I can cut well...so far gumpaste is the best.

Gumpaste pieces layered and cut out
More pieces...
Look at how detailed some of the pieces are...

It's amazing how well it cuts out the tiny letters
Completed seal after airbrushing
and wing emblems...
Finished product with SugarVeil flag...chocolate with chocolate mousse and vanilla with raspberry mousse
Carrot cake with cream cheese frosting
Chocolate cake with fudge filling