This cute little cake was for a bride that loves pink. The wedding reception was on Sunday, so I delivered it Saturday night to the groom's parents' home, and they transported it to the reception site on Sunday, and arranged the flowers on top. I made sure that I stabilized it with a wooden dowel going down the center of all 3 tiers. The cake was lemon with raspberry filling. Because it was decorated with fondant, and had a filling that did not need to be refrigerated, I knew they would be fine in transporting it, even though they were a little nervous. As you can see, it arrived safely. I airbrushed the fondant pieces with pink and pearl airbrush colors, which made the pieces glisten. My new airbrush works great with the thicker colors like the pearl and the metallics.
Monday, June 6, 2011
Saturday, May 14, 2011
Yum...sugar cookies for baby shower!!
Who needs a cake for a baby shower, when you can have yummy sugar cookies...or even better, do both, and get a sugar high. Anyway, as you can see, I had some more fun with my Cricut Cake, cutting out simple baby designs and then embellishing them a little with buttercream frosting. I've had friends ask me for my sugar cookie and icing recipes, so I will share those here. For my sugar cookie recipe, click here. The secret to making the cookie dough is to beat the wet ingredients until light and fluffy, and then mix in the dry ingredients until just incorporated, being careful not to mix more than necessary. This will keep your cookies nice and tender. Roll your cookies out on a floured surface, being careful not to roll out too thin. Transfer them onto your baking sheet and then lightly brush the excess flour off with a small paint brush. If your cookies are small, bake them only for the minimum amount of time, 6 minutes. The cookies that you see in the pictures here are 4 inch cookies, and I bake them for 7 minutes. They will not look brown at all when you take them out of the oven. I let them rest on the cookie sheet for a few minutes while I bake the next batch, and then take them off to let cool on a wire rack. As soon as they are cool (only a few minutes), you can stack them to save room on your cooling rack. When they are completely cool, you can dip small cookies in fondant, or pour and smooth on for the larger cookies. Once the fondant is set, you can decorate with buttercream frosting. My oldest son still enjoys Mom's sugar cookies, even though he is 33 yrs. old. So, even though I can't send him fancy decorated cookies, I usually make heart shaped cookies for Valentine's Day, just spread my buttercream icing on them, and add a few sprinkles. Then I wrap them individually and pack them well in a box with styrofoam peanuts. Below is my poured fondant recipe, as well as my tweaked buttercream icing recipe.
Poured Fondant
This will be a bit difficult, because I never measure my ingredients for my poured fondant, so make sure you experiment on your family first to get the proper consistency.
Powdered sugar
Corn syrup
Flavoring (I usually just use vanilla or butter vanilla)
Warm water
I make the fondant in my KitchenAid mixer, but you can even mix this up by hand, as long as you take time to get all the sugar lumps out. Add powdered sugar to bowl. How much will depend on how many cookies you have to dip. I normally fill my bowl approximately half way. Add about 1/3 to 1/2 cup of light corn syrup and desired amount of flavoring. Then, add warm tap water, a little at a time until your fondant is thin enough for dipping, but not so thin that you can see through it. Mix with flat beater on low speed until smooth. You do not want to add air bubbles to the fondant. With a little practice, you will know when you have the proper consistency. Now, put a cooling rack over a cookie sheet. As you dip the cookies, let the excess drip off, then using your finger, scrape off the edge of the cookie, and put on the cooling rack to allow to drip off any more excess fondant and set. Before the fondant sets, you can add sprinkles if desired, or make designs with colored fondant.
Tweaked Buttercream Icing Recipe
This recipe makes enough to ice and decorate a 1/4 sheet or 2 layer 8 inch round cake. When I make this recipe, I usually double the amount. It will stay good in the refrigerator for a couple of weeks or so. Just soften it up for a few seconds in the microwave and stir before using.
1 cup Crisco
1/2 cup salted butter (1 cube)
Flavoring to taste (I use butter vanilla)
1/4 -3/8 tsp. salt
6 cups sifted powdered sugar (or about 5 1/2 cups unsifted)
1/2 cup heavy whipping cream
You need to use a heavy mixer like a KitchenAid, or something similar, to make this icing. The tweaking I have done to this recipe is not with the ingredients, but with the way I mix it. First, beat the Crisco, butter, salt, and flavoring together on medium speed with the flat beater for several minutes until very light and fluffy. At this point, it will almost look like the finished icing. Then add 1/3 of the sugar and 1/3 of the cream and mix on low until combined. Scrape the bowl and add another 1/3 of each and mix again. Finally, scrape the bowl again, and add the last of the sugar and cream and beat on low until thoroughly combined, being careful to not add extra air into the mixture. The icing should be very smooth and fluffy. The reason for using Crisco is because it holds up better for decorating purposes. If you choose to use all butter, lower the amount of salt to 1/8 tsp. To color the icing, I recommend using liquid paste colors. Also, I drape a kitchen towel around my bowl to help keep some of the sugar dust from flying all over.
Chocolate Buttercream
1 1/2 cups butter (3 cubes)
1/8 tsp. salt
Vanilla to taste
1/2 - 2/3 cup cocoa
6 cups sifted powdered sugar (5 1/2 unsifted)
5/8-3/4 cup heavy whipping cream
2 Tbsp. light corn syrup
Mix as directed above, adding cocoa powder in with the first addition. Adjust the amount of cocoa powder depending on the richness of the chocolate you desire.
Friday, May 6, 2011
"Tweaked" marshmallow fondant recipe
Now that I've been making marshmallow fondant for some time, I've tweaked the recipe, and it comes out perfect every time. Of course, if you're new at making fondant, it will take a little practice like anything else. A couple of things I really like about marshmallow fondant is that you can basically add any flavor you want to it while the marshmallows are in the "soupy" stage, and I love the easy handling of the fondant because of the elasticity of the marshmallows. I have tried several "ready to use" fondants, and I always go back to using the marshmallow fondant.
Marshmallow Fondant Recipe
1 lb. mini marshmallows (use a good brand, and make sure they are fresh)
2 T. water
2 tsp. corn syrup
flavoring
5-6 cups sifted powdered sugar
Crisco
Pour marshmallows into a large microwave safe bowl. Add the 2 T. of water and mix. Heat on high for 40 seconds, stir and heat again for 40 seconds, stir one more time and heat another 40 seconds. Stir well, and add desired flavoring and 2 tsp. corn syrup. This mixture will be "soupy." Add 1 cup of the powdered sugar and stir well. In the meantime, measure out 4 cups of sugar onto a well greased surface. I have a silicone mat that works really well, but any surface will do. Make a well in the center to pour marshmallow mixture into. With a greased scraper, scrape the marshmallow mixture out of the bowl into the "sugar well." Grease hands generously and knead in the powdered sugar completely, scraping the surface as necessary, and adding more Crisco to your hands if it becomes sticky. Continue to knead until very smooth and elastic. You know you have added enough sugar if your fondant does not spread when you let it set for a few seconds. It will depend on the humidity...you will need to add more sugar if you are in a humid climate. I never add more than 5 cups total because we are in a very dry area. Once your fondant is done, coat the entire fondant with a layer of Crisco and then put it in a zip-lock bag and let it rest at room temperature overnight. When you are ready to roll it out, put it in the microwave for a few seconds to soften it. (I usually do it for about 20 sec., but it will depend on your microwave.) Knead it a little to make it pliable, and then roll it out on a lightly greased silicone mat. The reason I love the silicone mats is because the fondant will stick to the mat until you peel it off. This makes it easier to get the correct placement on your cake and you can also roll it out thinner without it tearing. Some decorators roll fondant out with cornstarch if they don't have a mat, but that tends to dry out your fondant. If you use this method, you will just want to drape it over the rolling pin and then position it on your cake. Before you put the fondant on your cake, be sure to have a good layer of buttercream frosting so the fondant will adhere to the cake. Smooth the fondant out carefully with hands, cut off excess with a pizza cutter, and then smooth again. Again, remove any excess around bottom. You can also use a fondant smoother, but I prefer the control and feel of using my hands.
1 lb. mini marshmallows
2 T. water
2 tsp. corn syrup
1/4 - 1/2 cup baking cocoa (regular for rich brown, special dark for dark brown)
4-5 cups sifted powdered sugar
Crisco
Follow the directions for the regular marshmallow fondant, except mix in 1/4 cup cocoa along with the corn syrup. Mix 1 cup sugar into marshmallow/cocoa mixture and then pour into remaining 3 cups of sugar. After completely mixed and kneaded, coat with Crisco and let rest overnight. At this point, your fondant will be a medium brown color. The next day when ready to use, soften your fondant in the microwave, and then you will want to grease your surface well, and add about another 1/4 cup cocoa (a little at a time) with very well-greased hands and knead it in until smooth and shiny, and desired color. Keep adding Crisco to your hands to work in the excess cocoa.
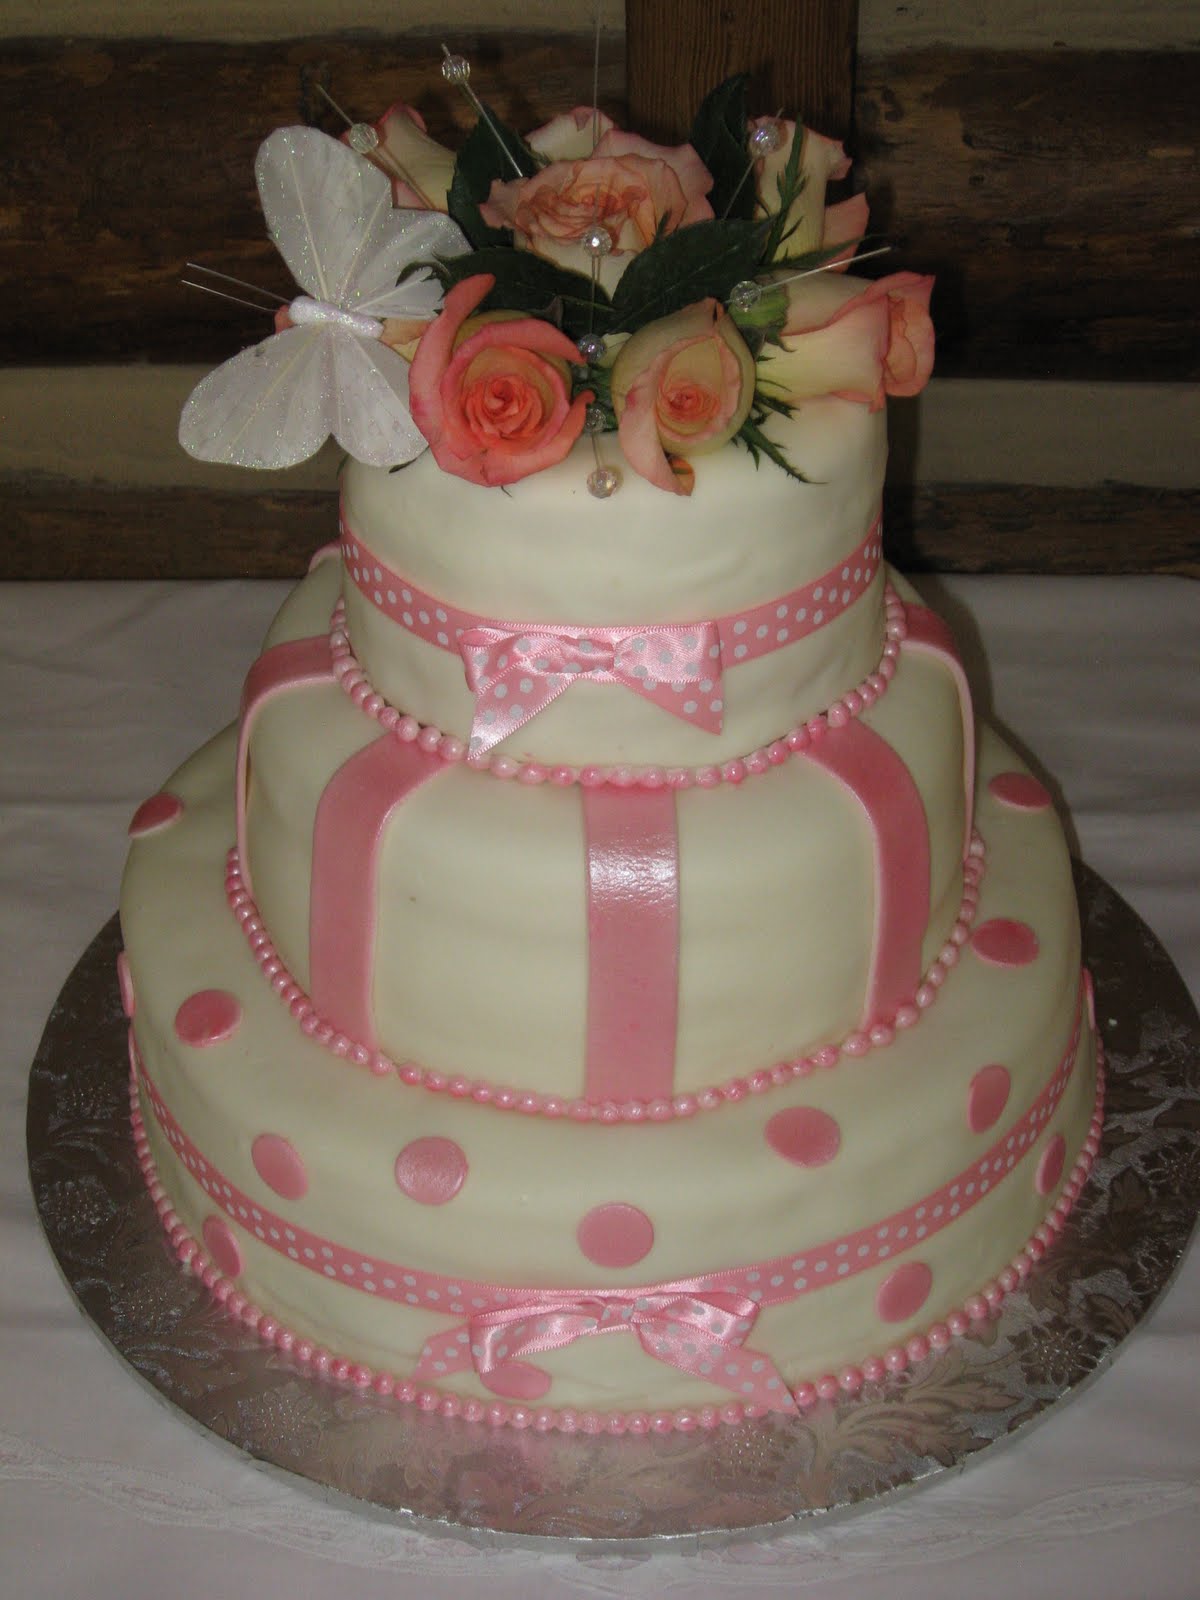
Marshmallow fondant...very smooth and easy to handle
Chocolate fondant...my favorite...smooth and shiny...almost resembles chocolate ganache...tastes like a tootsie roll
Thursday, May 5, 2011
Grooms Cakes
I have had several of my customers ask me about Groom's Cakes. I found this article, courtesy of Rare Occasions Cakery, that explains about the history of grooms cakes...
Traditionally, small pieces of the groom’s cake were wrapped and sent home with unmarried female guests. It was believed that if a maiden tucked the cake under her pillow, her dreams would reveal the man she was to marry. If you'd like to revive this tradition, wrap pieces of groom’s cake in foil or in small gift boxes, and attach a note describing the tradition.
Nowadays, the bride often orders the cake with the groom’s favorite flavor, filling and icing, and then keeps it a secret from the groom. Because the cake is a gift from the bride to the groom, it often reflects the groom's interests and comes in a variety of flavors (although chocolate has been historically popular) and themes (such as sports teams). A groom's cake with a sentimental message is a heartfelt, timely, and surprising wedding present to your significant other.
Some grooms may, if they prefer, order the cake and keep it a secret from the bride. Many grooms like to have the cake decorated or shaped into something that reflects one of their hobbies, or something the couple enjoys doing together.
Keep in mind that while considering the grooms cake, you may want to consult with your fiancĂ© to see how he would prefer this tradition to be carried out. After all, the purpose of the groom’s cake is to honor the groom in a special way!
Many prefer to have the groom’s cake at the reception, usually on a same table next to the wedding cake.
However if the idea of another cake at the wedding sounds redundant, consider serving it at the rehearsal dinner.
Some fun ideas for groom’s cakes are favorite sports/sports teams, musical instruments, outdoors/fishing/hunting, entertainment/movies/video games/books/card games, superhero’s, favorite foods, tux.
Saturday, April 30, 2011
Bridal Fair at David's Bridal
I was invited to be a guest vendor at an in-store bridal fair at David's Bridal last night. So I prepared the same sample cakes that I had done for the AFA fair, except on a smaller scale. Things slowed down quite a bit after the first half, but it was fun to watch the bride's try on gowns...and of course Nancy and I gave our humble opinions on which gowns looked the nicest. Even though most of these brides aren't getting married for a year or more down the road, it still gave them the opportunity to taste my product and hopefully meet with me at a later time. Also gave me the opportunity to share my business with other vendors, which is always a great networking tool.
Wednesday, April 27, 2011
Crepes...
Crepes are fun and easy to make. They are very versatile...you can make them with all different kinds of fillings and eat them for a full dinner entree with a vegetable and/or salad or serve them warm or cold filled with fruit or creams for dessert. Below I have posted two recipes...the recipe for basic crepes and also a lower fat version for those of us who are watching our calories (this is the one I usually make).
Basic Crepes
1 1/2 cups all-purpose flour
1 T. sugar
1/2 t. baking powder
1/2 t. salt
2 cups milk
2 T. butter, melted
1/2 t. vanilla
2 eggs
Low-Fat Crepes (WW points plus: 2 crepes=3 pts)
1 1/2 cups skim milk
1 cup + 2 T. flour
3 large eggs
1/8 t. salt
Put all ingredients in blender and beat until smooth. Lightly spray 8" pan with non-stick cooking spray. (If you spray too heavily, the crepe batter will slide off the sides of the pan.) Heat over medium heat. For each crepe, pour a scant 1/4 cup of the batter into the pan and immediately rotate pan until thin film covers bottom and part of sides. Cook until light brown. Turn and cook other side until barely light brown. (I turn the crepe when it starts to pull away from the sides of the pan.) Keep crepes covered until ready to serve. Sprinkle dessert crepes with powdered sugar or top with whipped cream. Spoon a savory sauce or gravy over meat, seafood, or veggie crepes. Makes about 15 crepes.
Crepe Fillings
Meat
Seafood
Seafood & Rice
Veggies
Any kind of berries
Pie fillings (apple, cherry)
bananas
puddings
mousses
cream cheese
sour cream
whipped toppings
ice cream
One of our favorite fillings consists of tuna or canned salmon, rice, cream of celery soup (thinned with a little milk), and seasonings. Then we make a gravy of cream of chicken soup (again thinned with a little milk). For you WW friends, remember you can reduce the points by using low-fat soups and skim milk. Be creative with your fillings and enjoy!
These crepes are filled with fresh strawberries and just a bit of lite Cool Whip, then sprinkled with powdered sugar...yum!
Labels:
crepe fillings,
crepe recipes,
Crepes,
Low-fat crepes
CAKE POPS!
I've been learning several new things lately...my latest experiment is cake pops. I had some left over icing, so I whipped up a cake mix and came up with these fun little treats...
These are chocolate cake with peanut butter frosting and decorated with both semi-sweet chocolate and white chocolate and various kinds of sprinkles. I will be donating them to the young women in our church ward for their garage/bake sale to earn money for camp. I had been wanting to try these, so I thought this was a perfect opportunity.
I wish someone would have come up with these things years ago. I can't tell you how many cake scraps I've thrown out over the years, and this is a fun way to use those. Actually, I think it would be better to use "slightly stale" cake scraps instead of fresh cake since mine is already very moist. They are yummy and will do OK as long as they are kept cool. The chocolate also helps to hold them together.
This is the basic recipe...
Crumble up a cake, add desired amount of frosting, or cream cheese, etc. to make a consistency that will work to roll into balls. Put them on a parchment lined baking sheet. Dip the end of lollipop sticks into melted chocolate and then into the balls. Freeze or refrigerate until firm, then dip in melted chocolate. Let excess drip off and then roll tops and upper edges in sprinkles, or you can decorate as desired. Let set right side up in styrofoam block or box that you have poked holes in. When set, you can wrap them in cellophane if desired.
Subscribe to:
Posts (Atom)