Showing posts with label party cakes. Show all posts

Friday, August 2, 2013

Backyard Neighbor...

We have neighbors that live behind us. Even though their backyard and ours are separated by only a shared fence, they actually live two streets away. The first time we met was when our shared fence blew down, so my hubby Bruce and Steve, our neighbor worked together to repair it. As they visited, Steve learned that Bruce was a home inspector and I was a cake decorator. Since then, Bruce has done inspections for Steve's son, and I have created some interesting birthday cakes for Steve's wife, Becky. Each year I look forward to designing something fun for Becky's July birthday. Here are some cakes that I have designed for her...

The year she turned 60.
This year she traveled allot with her work.
The year she turned 64...designed around the Beatles tune.
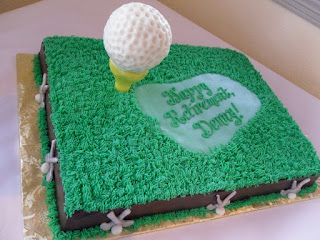
This year is Becky's year to complete things on her "bucket list."

Looking forward to next year's cake.

Tuesday, July 24, 2012

Modeling Chocolate Recipe

PLEASE SEE UPDATE AT BOTTOM OF POST.

Modeling chocolate (or candy clay) is an easy and fun medium to use when decorating cakes. You can use it in candy molds, use it like regular clay to mold figures free hand, or you can use it in combination with fondant or gumpaste (50/50) to give the fondant better stability and flavor, and then use it for anything that you would use gumpaste for. It can be made with real chocolate or with candy melts. The tutorial that I'm posting today is made with candy melts. You can use dark chocolate, milk chocolate, white chocolate, or any other color.

12 oz. package Wilton candy melts (you can use any brand-just make sure you measure out 12 oz.)
1/4 cup light corn syrup

Pour candy melts into microwave safe bowl, and melt according to directions. Each microwave is different as far as power, but it usually takes me 1 1/2 minutes, stirring at 30 sec. intervals, until smooth. 
 Assemble tools and ingredients
 Only 2 ingredients needed - candy melts and corn syrup
 Pour candy melts into microwave safe bowl
 Stir after 30 seconds
 Stir again after 60 seconds
Final stir after 90 seconds - candy melts should be smooth

To allow corn syrup to pour out of measuring cup easily, coat the inside of the cup with vegetable oil spray. Measure 1/4 cup light corn syrup (any brand will do), and pour into melted candy melts. Mixture will begin to firm up immediately. Continue to stir until completely incorporated and mixture has formed a ball. Pour onto wax paper and allow to cool. When cool, put in zip-lock bag and allow to set over night at room temperature. When ready to use, take off a small piece, color as desired with food safe colors, and knead in your hands, until color is fully incorporated, and chocolate is pliable. Mold into desired shapes. 
 Use vegetable oil spray to coat inside of measuring cup
 Corn syrup will pour out of cup easier when coated
 Add corn syrup to melted candy melts
 Stir until fully combined and formed into ball
 Place on wax paper to cool
When cool, place in bag to cool at room temperature overnight

Here are a few examples of cakes items I have modeled with modeling chocolate...

 Hat, boots, and belt molded from modeling chocolate

 Booties made from 50/50 fondant and modeling chocolate
 Golf ball and tee molded from rice krispie treats and covered with modeling chocolate
Rope heart, garlands, hat, and horseshoes molded from modeling chocolate

UPDATE FOR MODELING CHOCOLATE RECIPE (DECEMBER 2016)

After making and using and loving modeling chocolate for many years, here are some tips that will help to make your recipe for modeling chocolate easier and almost fool proof:

1) My favorite brand of chocolate to use is Ghirardelli melting wafers, both white and dark chocolate. Use 1/2 cup corn syrup per lb. of wafers. 
2) If using colored candy melts, use 1/3 cup corn syrup per lb. of candy melts.
3) Be sure not to overheat your chocolate. It's best to stir the last few wafers until melted, instead of keep heating them up. 
4) Warm your corn syrup for a few seconds, so that both the syrup and chocolate are same temperature... just barely warm to the touch. 
5) If you need to color an entire batch, add the paste color to the corn syrup, stir, then add to the melted chocolate. 
6) Make sure all chocolate is incorporated without over-stirring.
7) Spread out chocolate mixture very thinly between layers of plastic wrap, and let set for no longer than 1 hour. When it is set, but still pliable, knead it into a smooth ball or log. Wrap tightly, put in zip lock bag, and let set until firm. It can usually be used in about 2 hours if necessary.
8) The modeling chocolate will be very hard. When you need to use a piece, you can put it in the microwave for no longer than 5 seconds to soften just a bit.  

More examples of modeling chocolate


Monday, July 19, 2010

Twin Cakes

The last party cakes I designed were for two sisters turning 18. One was on a swim team and the other was into ballet. I wanted the cakes to be alike, yet different, and be kind of abstract, so these are what I came up with. Both were vanilla cakes...one with whipped cream and fresh strawberries, the other with chocolate mousse...yum!


Sunday, March 14, 2010

Happy March Birthdays...plus yummy Bavarian Creme recipe!

This is the latest cake that I did for my friend, Michelle, who works at Wynwood Assisted Living Center.


The cake flavor was Swiss chocolate with a Bavarian Creme filling. Michelle said it was a huge hit. I have always used a purchased ready to use Bavarian Creme until recently, when I discovered a yummy fresh alternative that I now make from scratch.

Easy Bavarian Creme Filling

8 oz. package cream cheese, softened
2 (3 1/2 oz.) packages vanilla instant pudding
3/4 cup milk
12 oz. Cool Whip, thawed

Mix together dry pudding mix and cream cheese. Slowly beat in milk. Fold in Cool Whip. You may also use other flavors of puddings.

Thursday, October 8, 2009

New website!!


I am excited to announce that my new website went live today! I put the new site together myself, with a little tweaking from my son, Brent. I'm pleased with the way it turned out, and hope that you will enjoy browsing through it. If you have any comments, I would be happy to hear from you.


Sunday, September 20, 2009

Combining fillings...


Yesterday we had a farewell party for our son-in-law Eddie, as he goes off  to AF basic training. He requested a yellow cake with raspberry filling. As I began decorating, I realized that I did not have quite enough raspberry filling to fill a half sheet, so I first put a layer of cream cheese filling, and then the raspberry over that. I called him after I had already filled and iced the cake and asked him if he liked cream cheese with raspberry, and thank goodness he said he did. I actually combine fillings quite often on cakes I do. Some of my favorites are cream cheese with fresh strawberries or lemon filling, fudge filling with raspberry, and whipped cream with fresh fruit. By the way, the cake was a big hit at the party!

Friday, September 11, 2009

Carrot cakes and new cookbook...


My son-in-law, Eddie, called and asked if I could have a 1/4 sheet carrot cake ready for him to take to work on Friday as a thank you to his co-workers, as it is his last day at T-Mobile. So I found this great recipe for carrot cake and cream cheese icing in my new cookbook, America's Test Kitchen Family Baking Book. The recipe calls for a whole lb. of carrots, which makes the cake moist, and a perfect blend of spices. I'm still having a little problem with my carrot cakes sinking slightly in the center due to high altitude, even though I added a little extra flour. I think next time I will try raising the oven temperature slightly and baking the cake for a shorter time. The cream cheese icing recipe called for an extra ingredient that I have not used before...sour cream. This recipe is not too sweet and whips up very nice and fluffy. This is not an icing you can do detailed decorating with, but it ices the cake very nicely, and tastes great!

Cream Cheese Icing

(2) 8 oz. bricks of cream cheese
10 T. softened butter
2 T. sour cream
1 1/2 t. vanilla extract
2 cups powdered sugar

Beat the cream cheese, butter, sour cream, and vanilla together at med. low speed until smooth. Add the sugar slowly and beat at low speed until smooth. Turn up the mixer speed to med. high, and beat until light and fluffy.


Friday, September 4, 2009

Cake artistry...mixing colors

I have often considered myself an artist. However, because I am a cake decorator and not a painter, my medium is icing instead of paint. My tools are decorating bags, spatulas, and paste and/or airbrush food coloring. My palette is mixing bowls and plastic containers. I thought about this last night as I was decorating the above pictured cake. It had several different shades of browns. When I work with browns, I normally always use chocolate buttercream and add to that, because it tastes better than just using plain old brown paste color. For example, the shoes and the underside of the hat are done with full strength thinned down chocolate buttercream. The upper portion of the hat and jacket were made by adding white buttercream, and for the hair and middle part of the sunflowers, I added a touch of red icing to the chocolate. Even the gray color for the gardening gloves was made from white buttercream, with a touch of chocolate and a very small addition of blue. This was a fun cake to do. I designed it for Michelle, a friend of mine who works at a retirement home...hence the interesting birthday names. I wanted to do something with sunflowers, since this is sunflower season in Colorado, and I thought the woman with the green thumb and large nose added character. The flavor of the cake was strawberry with fresh strawberry mousse.

Monday, August 17, 2009

Detail work...outlining with buttercream


I was looking at some of my cake pictures recently, comparing some of my more recent cakes with some done several years ago. Even though all were nice, the more recent cakes have much better detail and look nicer. I think what has made the difference is that I now use buttercream to outline, instead of piping gel, as I had many years ago. Often, I use chocolate buttercream, the darkness depending on the pattern I'm working with. I think I have also gotten pickier about being exact with my fill-in and detail work. For example, on this last cake I did for a friend's baby shower, I ended up doing the faces over again, because I was unhappy with the way the eyes looked first time around. Took me forever to decorate, but I was happy with the end result.


Friday, August 7, 2009

Fill-in Color Techniques

I received an email recently from someone who had visited my website and blog, asking me about the techniques I used to fill in the color on some of my party cakes, specifically the cakes shown on this post. Thanks to Julie for her question.

After pressing the pattern into the buttercream frosting, I outline the pattern with a normal consistency buttercream. To make the flow-in color, I add liquid paste color to the buttercream, and then thin it with Karo corn syrup. Using writing tips, I flow it into the the outlined pattern.

Monday, June 22, 2009

Party Cakes...

Party cakes are allot of work. They take extra time because you are usually working with several colors and a specific design that you have to come up with unless it's something that you've done before. I get allot of my patterns from google images. Of course, you can't charge as much for a party cakes as you do for wedding cakes, but sometimes you have to do the party cakes to get referrals for the wedding cakes, so it all works out in the end. I usually fill in as much of the design as possible with icing, and only use the airbrush for shading or background. It makes for a nicer finished product. Here is a picture of the cake I did today for my friend's daughter; she was into rainforests and wanted some specific things on the cake...gorilla, monkey with banana, and bird, so I ended up putting about 4 different patterns together to get the one desired picture. The cake was yellow filled with whipped cream and fresh strawberries.


Sunday, May 31, 2009

Especially for Star Wars fans...


Here's one of the seven cakes I decorated last week. I was asked to do a cake for Garrett, the son of my friend and hairdresser, for his tenth birthday. He wanted something from Star Wars and he let me use my decorator's prerogative to determine what I would put on the cake. I found this great picture of Yoda with a light saver. I thought it turned it out great, and I think Garrett enjoyed it.

Friday, May 15, 2009

Graduation, Promotion, and Retirement Cakes

It's that time of year again...graduations, promotions, and retirements. This is a cake that I did last last night for an Air Force retirement. Of course, living here in Colorado Springs I have the opporturnity to decorate cakes for military celebrations, especially Air Force. These cakes usually involve alot of work since they usually deal with creating detailed emblems in icing. I can also design graduation cakes for specific schools--colleges, high schools, and middle schools--customizing your cake with a specific logo or emblem. Prior to relocating to Colorado, this was most often my busiest time of year. One year I baked and decorated about 20 cakes within a 3 day period. Of course, I didn't sleep much, and was beginning to run out of room to place the completed cakes, but some how I managed to get through. I'm not sure I could or would want to be that busy again, but I do enjoy the opportunity to do these special cakes. My skill and talent for detail comes through.

Saturday, October 4, 2008

It's Fall and Halloween Time...

I love this time of year, with the leaves changing colors and Halloween, one of my favorite holidays. People want interesting cakes for Halloween also. The lastest cake I did was a coffin cake. I found a picture similar to this one on the internet, except changed the colors to a dark chocolate. I have found that I can get a really dark chocolate, resembling black, using Hershey's Special Dark Cocoa. I used to use black piping jel for outlining or when I needed black, but it tasted nasty and was difficult to use. Now I use buttercream made from the dark cocoa for all of my black. Tastes great, and handles much easier too.


Thursday, February 21, 2008

Wedding cakes vs. party cakes...

I have always enjoyed designing and decorating wedding cakes more than party cakes. There are several reasons why.
  1. When I have finished a wedding cake, I feel as I have created a masterpiece. I love being part of the whole wedding scene, and being able to design a cake that is perfect for the bride.
  2. There is usually less clean-up with wedding cakes because you don't have all of the different colors to worry about.
  3. There is hardly any profit in decorating party cakes. On the other hand, with wedding cakes, you can charge by the serving instead of by the cake. Customers are willing to pay more for wedding cakes because there is much more work involved.

When you are first starting to build a cake business, you almost have to decorate party cakes also, in order to build your business. When customers see and taste your work with party cakes, then they will know that you can also design wedding cakes. Taking pictures and keeping a good album of the cakes you have created is important so that your customers can see the work you have done.