Friday, September 18, 2015

Cake fillings... the difference between "cake" and "dessert"


After baking and decorating cakes for so long, I am very picky about the cakes that I choose to eat. I love cake, but eating a piece of ho hum cake with ho hum icing is like eating... well, "just cake," and I would just as easily pass it by. But when you have a deliciously moist piece of cake with a scrumptious filling and a great icing, it becomes a delightful dessert instead of "just cake." That is hard to resist. At Cathy Leavitt custom creations, we offer a wide variety of different fillings, from fruity to chocolate to fluffy mousses. Each one, combined with the right cake and icing, can be very tempting indeed. I have combined some of my favorite flavors as our Specialty Dessert Cakes on our menu. It's hard to pick a favorite, but anything with chocolate is always a hit. Lemon is becoming a strong second. 

Dark Chocolate Cake with Raspberry and Fudge Filllings

When we add a filling to a cake, I slice each layer in half. Note: I have an Agbay cake leveler that levels the top of the cake layer and slices the layer at the same time. One of my very very favorite decorating tools. Pricey, yes, but so worth it! Over the years, I have used many cake levelers and the problem is... they just don't work. If you're serious about cake decorating, look into this amazing tool!

Each cake normally consists of 2 layers, so after you slice each layer, you have four layers. I put filling between the top 2 layers and the bottom 2 layers, and add whatever icing I'm using in the middle. Before adding the filling, be sure to apply an "icing dam." Not only does this hold in the fillings, but it keeps the cakes level. Click here to visit my tutorial on filling cakes. This tutorial also contains recipes for an easy basic mousse filling and Bavarian Creme filling. To make a yummy coconut creme filling, you can add toasted coconut to the Bavarian Creme. (And then try not to eat it all before putting it on the cake... I know this from experience.)

Dark Chocolate Cake with Peanut Butter Mousse

Fill cupcakes? Oh yes, but you do not need a fancy cupcake corer in order to fill them. Just load your decorating bag with a large open round tip, like #12, push it into the center of your cupcake and squeeze... just don't go overboard. After awhile, you'll get the knack of it... so easy. After you've eaten a filled cupcake, you'll not go back to one without. 

 Spice Cake with Salted Caramel Mousse and 
Cream Cheese Icing, Drizzled with Salted Caramel
 White Almond Sour Cream Cake with Raspberry 
Filling, Vanilla Buttercream, and Toasted Almonds
Chocolate Cake with Bavarian Creme,
Chocolate Buttercream, and Toffee Bits

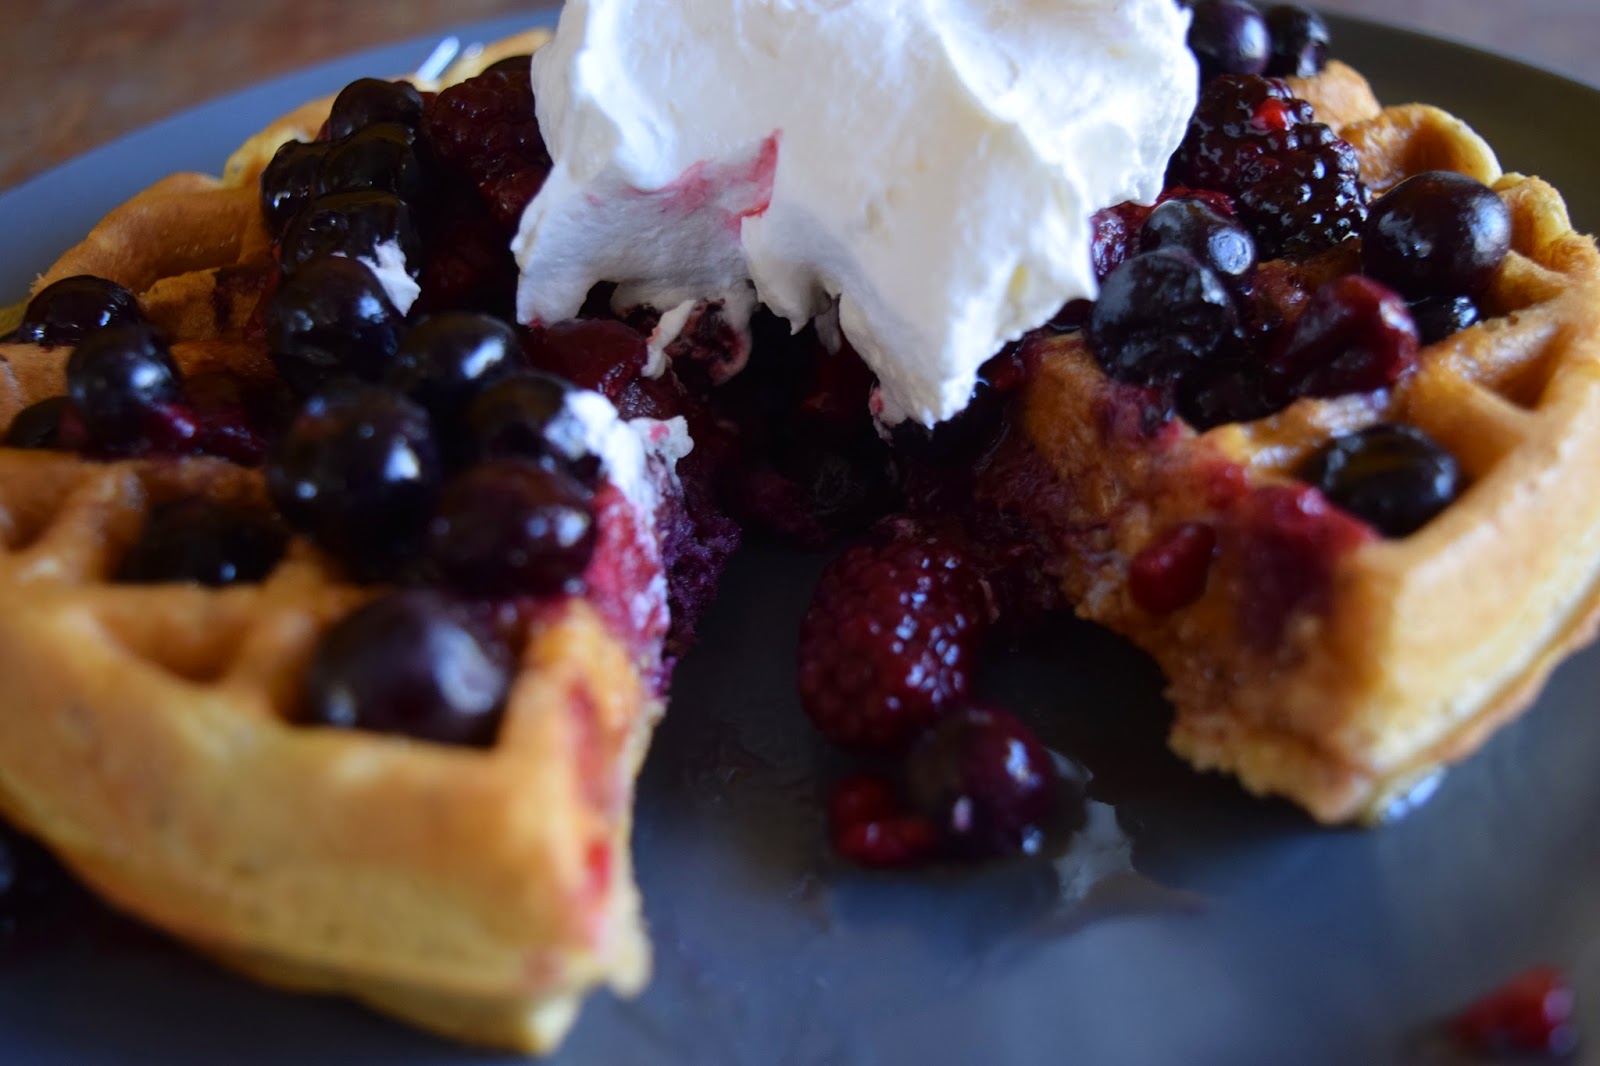
Fresh fruit can also be used as a filling in cakes. It is best to add a thin layer of whipped cream or mousse to the cake first, and then slice and layer the fruit on top. Some other good fruit fillings to use are Solo Raspberry Filling, Dickinson's Lemon Curd (my favorite), and Cherry All-Fruit Spread. Be creative and try different combinations! 

 Yellow Cake with Whipped Cream and Fresh Strawberries
Sample Cakes for Cake Tasting-
Chocolate Mint Mousse, Shirley Temple (1 layer of vanilla, 
1 of chocolate, with Bavarian Creme and white chocolate curls),
Lemon with Lemon Curd and Lemon Buttercream


Cornelli Lace and Scroll Work... both make beautiful cakes

If you are a follower of my blog, you know that I have been decorating a long time... actually about 38 years. A technique that was popular several years ago was a technique called cornelli lace. I still use it now and then, but it hasn't quite been as popular as in years past. To make cornelli lace, you need a very fine round tip (I usually use #1), and you basically squiggle randomly over the entire area of the cake without lifting the tip and without touching or overlapping any of the lines. The result is a pretty lace look on the cake. It becomes very easy with practice, but is still a little time concsuming. The way to make this technique look the best is to use a very small # tip and squiggle close together and very dainty so it resembles lace. I think it looks prettiest "white on white," but I've also used dark chocolate (never black) on a different color background. 

Pretty cornelli lace white on white buttercream
Delicate cornelli lace with mini pink roses and 
CTR emblem make a perfect baptism cake 
 Dark chocolate cornelli lace on white buttercream heart
 White on white cornelli lace wedding cake


Another beautiful technique that I have used lately is small scroll work over an entire area of the cake. Unlike cornelli lace, I used a bit larger of a tip (#2) and the surface of the cake is done in free hand scrolls of different kinds. Some of the scrolls touch, others do not. Again, the scrolls need to be quite close together in order for the design to look pretty. This scroll work technique takes much longer than the cornelli lace, but the end result is stunning. 


Simple and elegant

Monday, April 27, 2015

Salted Caramel... a heavenly food!


When I die and go to heaven, I hope that there at least these 2 things there that I can eat... chocolate and salted caramel. I would be a happy camper! Really though, if you have never tasted salted caramel, you MUST try this recipe. You will fall in love with the stuff, just like I did. The recipe is quite simple. The trick is to have everything ready before you start, because you don't want to take your eyes off the caramel once you start cooking it. It can go from perfect to burnt and not so perfect in a matter of seconds. 

Easy Salted Caramel (Makes about 1 1/2 cups)

1 cup granulated sugar
1/4 cup water
1 tsp. light corn syrup (helps reduce crystalization)
6 Tbsp. butter, cut in pieces
1/2 cup heavy whipping cream
1 Tbsp. pure vanilla extract
1 tsp. sea salt

Have all ingredients and everything you need ready and nearby, including glass jar or heat safe container. Since you're working with boiling sugar, your full attention is necessary.

In a medium to large saucepan (use a larger pan that what you might think as the mixture will bubble up at the end) add the sugar, water, and corn syrup. Bring to boil over high heat, stirring until sugar is dissolved. Try not to get mixture on sides of pan. 

Boil mixture without stirring for 5-12 minutes, or until it becomes a rich caramel color. Keep a watchful eye, as it turns from light amber to dark caramel color in a matter of seconds. You do not want it to burn. 

As soon as the sauce has turned caramel-colored, reduce heat to low, and carefully add in butter and stir until melted and combined. The mixture will bubble up. Next, slowly and carefully add the whipping cream and stir to combine. Again, the mixture will bubble up. Next add the vanilla and salt. The mixture will again bubble up. Whisk or stir until sauce is smooth and combined. Let it boil for another 1 minute. 

Pour into glass jar or heat-safe container. Do not scrape sides of pan. Allow to cool uncovered to room temperature, then cover and store in refrigerator. It will thicken and become solid when cool. Before using, zap for a few seconds in the microwave, or leave out at room temperature for an hour or so. 

Hint: I add the cooled sauce to my mousse recipe to make salted caramel mousse filling for cakes and cupcakes. You can also drizzle some over top of buttercream or cream cheese icing on cakes or cupcakes. OR you can get a spoon and eat it right out of the jar. (I know this from experience-be careful.)

Pour into glass jar or heat-safe container and allow to cool to room temperature
Cover and store in refrigerator.


Spice cupcake with salted caramel mousse filling, cream cheese icing, and salted caramel drizzled on top.

Wednesday, April 22, 2015

Our favorite breakfast...


Breakfast has always been my favorite meal of the day... so many yummy things to eat. I have to be very careful and only splurge once in a blue moon. One of our very favorite things to have for breakfast is waffles. We like the thick Belgian kind. We have gone through several waffle irons in our many years, but the one we have now is the best ever. It is a double waffle iron, and gets the entire batch done in no time flat. 

Waring Pro Professional Double Waffle Maker
After beating the eggs, add rest of ingredients and mix until smooth, then fold in chia seeds.
Pour onto hot waffle iron and sprinkle with pecans.

We eat one or two, and then put the rest in the refrigerator to eat later. I use a basic waffle recipe and jazz it up a bit, making it much tastier and a bit healthier. My favorite way to eat waffles is with fresh or frozen berries, syrup, and a little Coolwhip or whipped cream... yum, yum!


Whole Wheat Waffles

2 large eggs
1/4 cup oil
1/4 cup applesauce
1 3/4 cups milk (I usually use skim)
1-2 tsp. vanilla
1/4 cup brown sugar or honey
2 cups whole wheat flour (white wheat is the best for baking)
4 tsp. baking powder
1/2 tsp. sea salt
2 Tbsp. chia seeds 
pecans (finely chopped)

Heat waffle iron. Beat eggs until light and fluffy. Blend in wet ingredients, then add dry ingredients and mix just until smooth. Fold in chia seeds. Pour batter onto hot waffle iron and sprinkle with chopped pecans. Cook until done, and serve with favorite toppings. 


Monday, April 20, 2015

Having fun with molds and modeling chocolate!

A month or so ago, I secured an order for an "under the sea" quinceanera cake and cupcakes, coming up in June. The mom gave me a few pictures, but has pretty much given me free reign on the design. So anyway, I have been experimenting on using silicone molds- both ones I have purchased and ones I have made myself. 

By far, my most favorite silicone molds are ones from First Impression. Some of them are quite pricey, but worth it, if it's something you really need. I have gotten a couple of molds from them that I don't like. They are usually the ones that are very shallow. But, with only a couple of exceptions, First Impression molds are super! 


Recently, I have found a product to make my own silicone molds. It's called Amazing Mold Putty. It's a 2-part material that you blend together, and after a few minutes, it sets up. As long as I have an original of something I want to mold, this is great stuff. You can either buy it online, or at Michael's or Hobby Lobby. It costs about $20, but I wait until I have a 40 or 50 percent off coupon and use that. 


My favorite medium to use with these silicone molds is modeling chocolate. Click here for the recipe. I also use the ratio of 1 lb. of chocolate to 1/2 cup corn syrup when using Ghirardelli chocolate (my favorite). I like using modeling chocolate because it's easy to push into the molds, then you can plop it into the freezer for a few minutes, and it hardens really nicely so you can remove it from the mold. It's really fun to work with! So let me share with you a few things I've been working on. 

 I haven't painted any of these yet, but already they look amazing! 
 The detail is incredible!
 I tried making my own sand dollar mold, but it just didn't work out. This one is amazing!
 I love this! I added a little dark chocolate to white chocolate and the color already is pretty nice.
More coral... I'm so excited to use these on my cake!

Here are some of the molds I have made myself with the Amazing Mold Putty...


 Original starfish

Starfish made from modeling chocolate

Sunday, April 19, 2015

Red hats and yellow chicks... a cute combination!

So... my dislike for cupcakes is slowing dissolving... don't mind coming up with some cute and yummy creations as long as I have time. I still think some cupcakes are way too time consuming, but when some turn out really darling like these little chicks, I can't help but smile. These were cupcakes that I designed for a friend who belongs to the Red Hat Society. Her group is "Yellow Chicks." So she wanted cupcakes for a luncheon party, and this is what we came up with. They were lemon cake with lemon curd and lemon buttercream icing... one of my favorites! And, of course, I do have a special fondness for "chicks." 


Whistle While You Work...or Zing goes the strings of my heart...


Either way, I almost felt like singing while I was decorating these cookies. These are my yummy 4 inch sugar cookies with poured fondant and musical decorations cut out with my Zing electronic cutter. For these cookies, I piped a dark chocolate border and then filled them in with poured fondant. Then, I simply placed the musical notes and treble clefs that I had cut out the day before on each cookie. For those of you that regularly follow my blog, you know that I very seldom use black in my decorating, but instead use Hershey's Special dark cocoa, or Satin Ice dark chocolate fondant. Both taste soooo yummy, and pretty darn close to being black without the nasty taste. For the sugar cookie and fondant recipes, click here

It just works easier if you put your fondant in a squeeze bottle to fill in the cookie tops, so a while back when I was at Sam's, I bought these cool large squeeze bottles with a much larger opening and they work so much better than the old small ones I had. A little over 2 bottles full did all 3 dozen cookies! The trick is to keep the fondant warm, so when it begins to cool off, just stick your bottle in the microwave for about 20 sec. or so, and you're good to go. 
Decorations cut out with Zing electronic cutter... I LOVE my ZING!

Comparison of the 2 different sizes of squeeze bottles.
Cookies after borders are piped.  
  
             Use squeeze bottle to fill inside the piping.

Use toothpick to coax fondant into the right areas.

Cookies covered with fondant.
Place decorations on fondant. If fondant has set, you can use just a bit of edible glue to attach the pieces.
 Finished cookies