Monday, October 21, 2013

Autumn and Fall Leaves

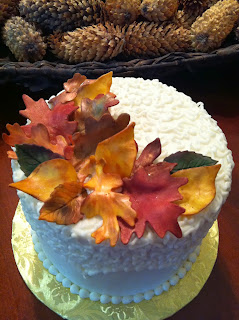
Oh, how I love the fall... the crispness in the air, the fall colors, and the leaves changing! One thing I always missed about living in Arizona was all the beautiful fall leaves... it just didn't happen. Being in Colorado, I look forward to this season every year. I designed a couple of pretty little cakes with fall leaves this year. I had lots of fun shading the leaves to look like something Mother Nature would do. Some of the leaves were modeled from modeling chocolate, others were part modeling chocolate and part gumpaste. I started with ivory color for some, and yellow for others. I think I liked the yellow ones the best. There are all shades of petal dusts and luster dusts to shade with. Just pick out ones that you think would best reflect what you see in nature. Some of my favorite are spiced pumpkin, mahogany, old gold, forest green, red velvet, and brown. One hint-make sure you get the kind that are "non-toxic" if you plan on eating the leaves. :) Roll your gumpaste/modeling chocolate out thin, but still thick enough to show the veins after using the veining tool. You can also use the back side of a real leaf as a veining tool. I found this out after I had made mine and I wish I would have used  this method instead, as some of my veins disappeared when I thinned out the edges. Let your leaves dry on pieces of crumpled up foil, so they have more of a realistic look and movement. You need to let them dry at least overnight, so that when you shade them, they won't fall apart. Then just be creative! This is the fun part... just use straight colors or blend them. I just use the same soft brush for all the colors. So much fun to be creative with your decorating! That's one reason I love cake decorating.

 Use crumpled foil to dry on

Be creative with your colors
 Simple little 6 inch anniversary cake
 8 inch birthday cake...I added some pine cones to this one

Here is a great little tutorial on making gumpaste leaves. Thanks to Alice Currah for sharing it.  Fall leaf tutorial

Saturday, September 14, 2013

Experimenting with modeling chocolate...

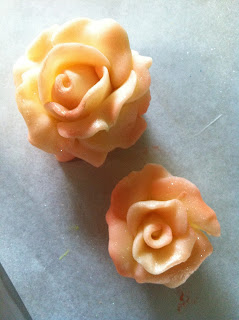
You can make some really cool stuff with gumpaste, but when you try eating it, it's not so great. So, I have been playing around with modeling chocolate lately, so you can eat the decorations without them tasting "nasty." The latest cake I experiemented with was a flower basket for a little girl's birthday. Of course they would want to eat the flowers, so instead of making them out of gumpaste, I used modeling chocolate. It is a little tricky to work with, but of course, they will taste yummy. The things that I don't like about making flowers from modeling chocolate is that you can't thin out the petals like you can with gumpaste, so they don't look as realistic as they normally would. Also, I noticed that the airbrush color does not go on as well. I had a problem with it beading up and taking forever to dry, so I guess I will have to stick with other coloring methods. Also, the modeling chocolate has a yellow tint, so the color is not as true as it is with gumpaste. I really like the way the basket turned out. It was made with 1/2 modeling chocolate and 1/2 fondant...still tastes good. I like the way it resembled a real basket. For the handle, I wound the 1/2 and 1/2 combination around a 1/2 inch clear vinyl tubing piece, and then let it dry for a couple of days. To insert it into the cake, I put 2 hollow plastic dowels in the cake and then inserted the ends of the handle into those, which gave it more stability. The vinyl tubing kept the handle from cracking. 

See how the basket looks real
Modeling chocolate roses
Mums from modeling chocolate
Leaves and daisy from modeling chocolate - not bad, but thicker than I like
1/2 chocolate, 1/2 fondant around vinyl tubing-I ended up cutting some off of each end
Allow to dry a few days

Monday, September 9, 2013

Harvest Time!!

For those of you with a sweet tooth, this kind of gardening may be right up your alley. First you have to start with that rich dark soil... crushed Oreos make the perfect "soil." Just put the cookies whole into the food processor and whirl away until you have Oreo dirt. Then model veggies and fruits from 1/2 modeling chocolate/ 1/2 fondant. Use your fondant tool to add details, but mainly just use your imagination and hands to make them into fun veggie and fruit shapes, and then cut out leaves to match each kind, then shade both the veggies and leaves with a little petal dust. Push aside a little of the "soil" on top of each cupcake, so the veggies and fruits will stick to the chocolate buttercream underneath. No need to water or weed this garden. The produce will be gone soon enough.


Sunday, August 25, 2013

My new arrival...

No, as you probably guessed, I'm too old to be having more babies. But my "baby" arrived last week in the form of a new oven!!! Remember in Fiddler on the Roof when Motel the tailor got his new sewing machine and everyone came over to congratulate him on his new arrival? That's kinda how I feel about my new oven. I am in love with my new LG oven. It bakes and cooks beautifully. My cakes are perfectly level. It plays a cute little tune and the lights blink off and on when the oven is preheated to the correct temperature, and then plays another tune when the timer is done, and repeats every 15 seconds until you turn it off. (I can't tell you how important that is for me!) And it's easy to clean. What more could I ask for? Oh, and I almost forgot the best part...it's a double oven. I finally replaced my old single oven, and now I can bake things in half the time! It's like Christmas in August. I'm so excited!! Special thanks to my hubby and son-in-law for lifting it upstairs to the kitchen and installing it.
My new baby... isn't it pretty?

Sunday, August 18, 2013

NOT your Weight Watchers Recipe...

As you can probably imagine, my love of baking and my desire to lose weight as a Weight Watchers member are not always compatible. This weekend was one of those times... If I could exercise 10-12 hours a day, I might not have a problem. However, since that is totally undesirable and entirely impossible for me, I have to either wear a face mask (which I have actually done in the past) or hide the culprit items. Yesterday it was chocolate all day, and today it was cookies... not just your average cookies, but probably some of the best oatmeal cookies I have ever tasted. The cookie dough is to die for (ask me how I know). :) They are chewy, chunky, and soft-just the way I like. I have been looking for a really good oatmeal cookie recipe for quite some time-one that has other things added besides just oatmeal, and does not go flat at our altitude. I found this recipe, thanks to Pinterest and Lil' Luna, with a few tweaks on my part. Enjoy! And oh, if you're trying to lose weight, don't forget to hide them or give them away after one or two. 


Cranberry Oatmeal Cookies

1 cup butter
1 cup sugar
1 cup brown sugar
2 eggs
2 tsp. vanilla
1 tsp. salt
1 tsp. baking powder
1 tsp. baking soda
2 cups flour
2 cups oatmeal
1 cup coconut
1 cup dried cranberries
1/2- 3/4 cup chopped pecans
1 cup chocolate chips ( I use dark chocolate)

Cream together butter, sugars, eggs and vanilla. Mix dry ingredients, coconut, cranberries, pecans, and chocolate chips together in separate bowl. Add dry ingredients to wet ingredients and mix well. Spoon or scoop onto parchment lined baking sheet. Bake at 350 degrees for 10-12 minutes. I baked mine for 11 minutes. Every oven is different, so watch closely. Do not overbake. Let set on cookie sheet for 3-5 minutes, and then remove to cooling rack. 

Note: I have been experimenting with my new oven. Just made these cookies again tonight, and baked them for only 9 minutes, so it really does depend on your oven. Watch them closely, and write down the perfect timing for you.

Friday, August 9, 2013

Red and black... really?

If you are a follower of my blog, you will know by now that I strongly dislike decorating with red or black food coloring. So, as an option, whenever possible, I use the following techniques:

(1) I use Hershey's Special Dark Cocoa to make black. I love this stuff! If you add enough cocoa to your buttercream or fondant, it REALLY does look black. Sometimes I add a small amount of light corn syrup to make it the consistency that I am looking for. 

(2) Whenever possible, I try to airbrush red pieces, especially flowers, instead of coloring the icing/fondant. That way I am using less color than I would otherwise. 

Satin Ice also makes a really really good dark chocolate fondant that resembles black. If you are not a fondant lover, this will change your mind. I guarantee it.

Something just tells me that because you have to use so much red or black food coloring to get a good intense color that it can't possibly be good for you. Sometimes the "end" result may not be good either. I will not go into detail about that last comment, but I have stories I could tell. 

Here are some cakes that I've done with red and black coloring using these techniques...

Airbrushed roses and dark chocolate lace
Airbrushed red fondant
Airbrushed red gumpaste
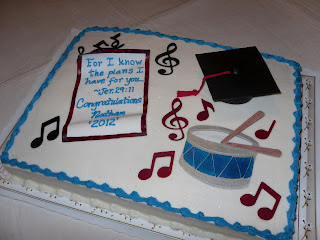
Airbrushed gumpaste musical notes and treble clef
Dark chocolate spider webbing
Dark chocolate borders made with Satin Ice dark chocolate fondant and blue silicone mold
Dark chocolate poured fondant
Dark chocolate fondant flowers
Dark chocolate fondant/gumpaste ribbon
Dark chocolate buttercream scrollwork on fondant
Dark chocolate buttercream piping on whipped cream...yes, the bead border is actually piped buttercream


Friday, August 2, 2013

Backyard Neighbor...

We have neighbors that live behind us. Even though their backyard and ours are separated by only a shared fence, they actually live two streets away. The first time we met was when our shared fence blew down, so my hubby Bruce and Steve, our neighbor worked together to repair it. As they visited, Steve learned that Bruce was a home inspector and I was a cake decorator. Since then, Bruce has done inspections for Steve's son, and I have created some interesting birthday cakes for Steve's wife, Becky. Each year I look forward to designing something fun for Becky's July birthday. Here are some cakes that I have designed for her...

The year she turned 60.
This year she traveled allot with her work.
The year she turned 64...designed around the Beatles tune.
This year is Becky's year to complete things on her "bucket list."

Looking forward to next year's cake.