Wednesday, December 11, 2013

Christmas and homemade candy... the perfect combination!

It just doesn't seem like Christmas without making some kind of homemade candy. Just the thought of making fudge or peanut butter balls brings back a flood of happy memories. I still have some of the recipe cards or little pieces of paper with the original recipes tucked carefully into my recipe binder ... the peanut butter ball recipe from Bruce's Grandma or the fudge recipe from my mom.  I'm still trying hard to stay on my Weight Watchers program, so probably won't make any candy until just before Christmas this year... maybe a fun activity to do with my granddaughters who will be here. Here are a few of our favorite family recipes ... enjoy, and Merry Christmas!


MILLION DOLLAR FUDGE

Combine the following ingredients in a large bowl:

3 large (7 oz.) Hershey Almond bars, broken up
1 (12 oz.) package chocolate chips
1 (7 oz.) jar marshmallow cream
2 tsp. vanilla

Bring the following ingredients slowly to boil, stirring frequently:

1 cube melted butter
6 cups granulated sugar
1 12 oz. can evaporated milk

 Boil 7 minutes at a rolling boil; then pour second mixture over first mixture and let stand for a few minutes. Stir until smooth. Add 2 – 4 cups of nuts. Spread in greased pan. 


GREAT GRANDMA LEAVITT’S PEANUT BUTTER BALLS

2 cups peanut butter
½ cup butter
4 cups powdered sugar
3 cups crisp rice cereal

Mix together and form into balls. Chill and dip in chocolate coating.

TERRIBLY TERRIFIC TOFFEE

1 cup butter
1 cup brown sugar
2 cups semi-sweet chocolate chips
40 saltine crackers

Preheat oven to 350ºF. Line a 15x10-inch jelly roll pan or a 12x17-inch cookie sheet with foil and spray with non-stick spray. Lay a flat layer of crackers out on the foil. Melt the sugar and butter until a boil is reached. Reduce the heat and simmer, uncovered, for 5-6 minutes or until mixture is thickened and sugar is completely dissolved. Pour this mixture over the crackers and spread to coat evenly. Bake for 8-10 minutes, or until the toffee becomes bubbly. After removing the pan from the oven, let it sit for 3-5 minutes. Sprinkle on the chocolate chips, let them soften and melt, and then spread them into an even layer. (You can add nuts, cracker crumbs, etc. at this point.) Let cool or refrigerate until hardened. Break into pieces the size of your choice.


EASY OREO TRUFFLES

1 package (8 oz.) cream cheese, softened
1 package ( 1 lb. 2 oz.) Oreo cookies, finely crushed (about 4 1/4 cups), divided
2 packages semi sweet dipping chocolate, melted


Mix cream cheese and 3 cups of the cookie crumbs until well blended. Shape into 48  (1 inch) balls. Dip in melted chocolate; place on lined baking sheet. Sprinkle with remaining cookie crumbs. Refrigerate for 1 hour or until firm. Store in tightly covered container in refrigerator.

COCONUT DIPPED CHOCOLATES

1 can Eagle Brand sweetened condensed milk
1 (2 lb.) bag powdered sugar
1 cup (2 sticks) melted butter
1 (14 oz.) package coconut
Your preference of amounts and kinds of nuts and fruit

Combine ingredients, roll into balls, chill, and dip in chocolate coating.

This last recipe I have catergorized under my cookie recipes, but it is so simple, unbaked, and dipped in chocolate, that it could also be thought of as a candy. We make tons of these every Christmas. It is one of my most popular catered items at Christmas time. 


RITZ PEANUT BUTTER COOKIES

Ritz Crackers
Peanut Butter
Chocolate candy coating

Spread small amount of peanut butter between two Ritz crackers.  Dip in melted chocolate and decorate or sprinkle with red and/or green sprinkles.  Set on wax paper to harden.  You can melt the dipping chocolate in the microwave, 30 sec. at a time until you can stir it smooth. 


EASY MINT COOKIES

Ritz Cracker or Oreos
Chocolate candy coating
Peppermint oil

Melt chocolate candy coating and add a few drops of peppermint oil (Make sure you use oil and don’t use too much as it is very strong.)  Dip Ritz crackers or Oreos.  Decorate or sprinkle as desired.  Set on wax paper to harden.

Some Christmas party trays...


Wednesday, December 4, 2013

Pumpkin... more than just jack-o-lanterns!


Back in the middle of October, we went to Diana's Pumpkin Patch in Canon City with my daughter and her family. It was a fun experience with the grandchildren. Part of the admission price includes a free pumpkin, so we came home with a couple of large pumpkins that I have had by our front entrance door until today. 


Yes, I know I'm a little slow with the seasonal decor, but I finally got around to baking and pureeing my pumpkins. It wasn't difficult, just a little tedious, and now I have my year's supply of pumpkin in freezer bags in my freezer. I didn't know it would make so much. 2 large pumpkins = 18 1/2 (15 oz.) bags of wonderful pumpkin puree. Click here to learn how to make homemade pumpkin puree.


I'm not much of a pumpkin pie fan, but there are other yummy pumpkin recipes that I thoroughly enjoy. Here are a few of my favorite...


PUMPKIN RECIPES

Easy Pumpkin Muffins

1 (18.25 oz.) package yellow cake mix
1 (15 oz.) can pumpkin puree
1 teaspoon ground cinnamon
½ teaspoon ground nutmeg
¼ teaspoon ground cloves

Preheat oven to 350° F. Grease a 12 cup muffin pan or line with paper liners. In a large bowl, mix together the cake mix, pumpkin puree, cinnamon, nutmeg and cloves until smooth. Spoon equal amounts of batter into the prepared muffin cups. Bake for 20-25 minutes in the preheated oven, until a toothpick inserted in the center of one comes out clean.
Suggestion from Mrs. Leavitt: You can also use a spice cake mix and use only half the amount of spices.
  
Iced Pumpkin Cookies

1 ½ cups all-purpose flour                         Glaze
1 teaspoon baking powder                         2 cups confectioners’ sugar
1 teaspoon baking soda                             3 Tablespoons milk
2 teaspoons ground cinnamon                  1 Tablespoon melted butter
½ teaspoon ground cloves                         1 teaspoon vanilla extract
½ teaspoon salt
½ cup butter, softened
1 ½ cups white sugar
1 cup canned pumpkin puree
1 egg
1 teaspoon vanilla extract


Preheat oven to 350° F. Combine flour, baking powder, baking soda, cinnamon, nutmeg, ground cloves, and salt; set aside. In medium bowl, cream together the ½ cup of butter and white sugar. Add pumpkin, egg, and 1 teaspoon vanilla to butter mixture, and beat until creamy. Mix in dry ingredients. Drop on cookie sheet by tablespoonfuls. Bake for 15-20 minutes in preheated oven. Cool cookies, then ice with glaze. To make glaze: Combine confectioners’ sugar, milk, 1 tablespoon melted butter, and 1 teaspoon vanilla. Add milk as needed, to achieve proper consistency. 

MRS. FIELDS PUMPKIN SPICE COOKIES
  
2 ½ cups all-purpose flour
½ tsp. baking soda
¼ tsp. salt
2 tsp. pumpkin pie spice
1 cup brown sugar, packed
½ cup white sugar
¾ cup salted butter, softened
1 large egg
1 cup pumpkin (canned or freshly cooked)
1 tsp. vanilla extract
1 cup raisins (optional)
½ cup nuts, chopped (optional)
1 cup chocolate chips (optional)

Yield: 3 dozen

Preheat oven to 300°.
In a medium bowl combine flour, soda, salt and pumpkin pie spice. Mix well with a wire whisk and set aside.
In a large bowl blend sugars with an electric mixer set at medium speed. Add the butter and beat to form a grainy paste. Scrape sides of bowl, then add egg, pumpkin and vanilla. Beat at medium speed until light and fluffy.
Add the flour mixture, raisins, nuts, and chocolate chips. Blend at low speed just until combined. Do not over mix.
Drop by rounded tablespoons onto ungreased or parchment lined cookie sheets, 1 ½ inches apart. Bake 22-24 minutes until cookies are slightly brown along edges. Immediately transfer cookies to a cool surface.

PUMPKIN CAKE ROLL


3 eggs
1 cup fresh or canned pumpkin puree
1 cup sugar
1 t. lemon juice
1 tsp. baking powder
1 cup flour
2 tsp. cinnamon
1 tsp. nutmeg
1 tsp. ginger
½ tsp. salt
1 cup finely chopped nuts

Filling

8 oz. cream cheese
¼ cup butter
1 cup powdered sugar
1 tsp. vanilla

Preheat oven to 375°. Beat eggs for 5 minutes. Add the pumpkin, sugar, lemon juice and dry ingredients. Mix until smooth. Spread into a greased and floured jelly roll pan. Sprinkle with the chopped nuts. Bake for 15 minutes. Turn onto terry cloth dish towel, nut side down, that has been sprinkled generously with powdered sugar. Roll up into a roll lengthwise to cool. Meanwhile, beat together the filling ingredients. When pumpkin roll is cool, unroll and spread on the filling. Re-roll and wrap in plastic wrap and refrigerate until thoroughly chilled. Slice and serve.


Holiday Pumpkin Mousse

1 small package vanilla instant pudding mix
1/2  (15 oz) can pure pumpkin
pumpkin pie spice to taste (or cinnamon, nutmeg, and cloves)
1 cup milk
8 oz. cool whip, divided

Crunch Topping
1/2 cup brown sugar
2 crushed graham crackers
1/4 cup chopped nuts (I use pecans)
pumpkin pie spice or cinnamon to taste
1/4 cup melted butter

Combine topping ingredients and spread on baking sheet. Bake @ 350 degrees until browned and crunchy. Cool.
Combine dry pudding mix with pumpkin and pumpkin pie spice. Slowly add milk and beat until smooth. Fold in approx. 5-6 oz. cool whip. Top with crunch topping and more cool whip. For parfaits: in tall glasses, layer the mousse, cool whip, and crunch topping, then repeat, ending with a dollop of cool whip and topping. 


The Whole Enchilada Chicken Soup


3 cups fat free chicken broth
1 ¼ cups finely chopped celery
½ cup diced sweet onion
3 cups green enchilada sauce
(1) 15 oz. can pure pumpkin
(1) 4 oz. can chopped green chilies
10 oz. cooked chicken breast, chopped or shredded
1 cup frozen corn
Hot sauce to taste (optional)
 
In large pot, bring broth to low boil. Add celery and onion and simmer until tender. Stir in enchilada sauce and pumpkin. Once soup returns to a low boil, add chilies, chicken and corn, and mix well. Cook an additional 3-5 minutes, until heated thoroughly. Add hot sauce and serve with shredded cheese, crushed tortilla chips, and sour cream if desired.

Tips:
1. You can add canned chicken to make preparation quicker. I usually add 2 cans.
2. I also add one can of black beans and one can of kidney beans (both rinsed and drained) to make the soup more hearty. 


Thursday, November 14, 2013

Who knew teaching could be this much fun?

I think I have always had a passion for teaching... now combine that with baking, and well, I'm in my zone. Tonight I had several ladies from our church over for a dinner roll and cinnamon roll making class. I set up a table in the living room (which is right next to the kitchen, but where there was more room to set up chairs) and plugged in my KitchenAid mixer and we were good to go. 12 ladies and a couple of kids later and the rolls and cinnamon rolls were about devoured. Thanks ladies for a fun evening, and for letting me share my passion and a few of my skills. I enjoyed it! Click here for dinner roll and cinnamon roll recipes.

Busy mixing the bread dough.
 Ladies intent on learning...
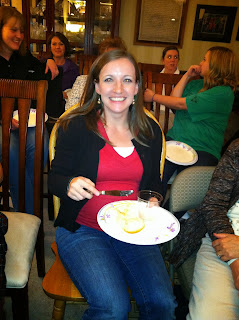
Lauren enjoying her roll. (I wish I had looked this cute pregnant.)
  All that was left from the 2 dozen rolls.
Cinnamon rolls fresh from the oven.

Wednesday, October 30, 2013

Lots and lots of cookies!

This was one of those weekends that really made me appreciate the new double oven. I had a catering order for a cookie and punch reception for 100 people on Saturday night. That meant baking 17 dozen cookies on Saturday, after decorating a cake that morning. So I baked a variety of the large bakery style cookies... all my faves... marbles, snickerdoodles, peanut butter chocolate chip, and oatmeal coconut with cranberries, pecans, and dark chocolate chips (these went fast!). Anyway, however you look at it, that's alot of cookies! My kitchen looked like a little cookie factory for sure, and the house smelled heavenly for about 2 days afterwards. A side note... I was very proud of myself for staying on track with my Weight Watchers program... all those cookies and I didn't get into any. That's a first I think. Miracles do happen!

First of the cookies ready for the serving table

Tuesday, October 29, 2013

Wedding cake or party cake?

So, if you are a big superhero fan, why not have a superhero party for your wedding reception? That's exactly what this bride and groom did, and the wedding cake reflected the rest of the decorations. Here is the cake with logos from their 4 favorite superheros... Deadpool, Green Lantern, Captain America, and Batman. The logos and side decorations were all cut out with my Cricut Cake. The most time consuming part, other than coloring and assembling the pieces, was putting all of the little windows around the four sides of the 14 inch square Batman tier. The top and bottom tiers were covered with dark chocolate fondant. I must say that this was the most unique wedding cake I have ever designed. 


Newest Additions to Kitchen

So when I replaced my old oven with the new double oven, I lost the storage space I had in the bottom drawer. Don't get me wrong, I was glad to exchange storage space for a second oven. It's just that now I needed somewhere to put all that stuff that I had stored there. Hubby to the resue, after daughter having a brilliant idea. I had two fake drawer fronts under my counter that we decided to turn into "real" usable drawers... perfect size for the items I needed to store plus extra space. Then we also put flip out drawers for my kitchen sink goodies under the sink. I love being organized and the extra bit of space I acquired. Thanks to my hubby for sacrificing some of his extra time to help me out. A side note... I found a new home for my "old faithful" oven. My old oven still worked well, it was just old, and I needed the room in a double oven. I was hoping to find a good home for it, and yesterday I was able to give it to a sweet young mother from our church. So glad someone will be able to use it. 


Monday, October 21, 2013

Autumn and Fall Leaves

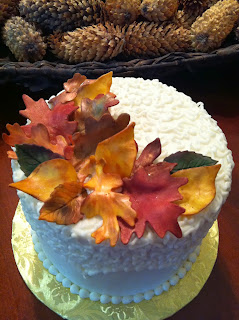
Oh, how I love the fall... the crispness in the air, the fall colors, and the leaves changing! One thing I always missed about living in Arizona was all the beautiful fall leaves... it just didn't happen. Being in Colorado, I look forward to this season every year. I designed a couple of pretty little cakes with fall leaves this year. I had lots of fun shading the leaves to look like something Mother Nature would do. Some of the leaves were modeled from modeling chocolate, others were part modeling chocolate and part gumpaste. I started with ivory color for some, and yellow for others. I think I liked the yellow ones the best. There are all shades of petal dusts and luster dusts to shade with. Just pick out ones that you think would best reflect what you see in nature. Some of my favorite are spiced pumpkin, mahogany, old gold, forest green, red velvet, and brown. One hint-make sure you get the kind that are "non-toxic" if you plan on eating the leaves. :) Roll your gumpaste/modeling chocolate out thin, but still thick enough to show the veins after using the veining tool. You can also use the back side of a real leaf as a veining tool. I found this out after I had made mine and I wish I would have used  this method instead, as some of my veins disappeared when I thinned out the edges. Let your leaves dry on pieces of crumpled up foil, so they have more of a realistic look and movement. You need to let them dry at least overnight, so that when you shade them, they won't fall apart. Then just be creative! This is the fun part... just use straight colors or blend them. I just use the same soft brush for all the colors. So much fun to be creative with your decorating! That's one reason I love cake decorating.

 Use crumpled foil to dry on

Be creative with your colors
 Simple little 6 inch anniversary cake
 8 inch birthday cake...I added some pine cones to this one

Here is a great little tutorial on making gumpaste leaves. Thanks to Alice Currah for sharing it.  Fall leaf tutorial