Monday, April 20, 2015

Having fun with molds and modeling chocolate!

A month or so ago, I secured an order for an "under the sea" quinceanera cake and cupcakes, coming up in June. The mom gave me a few pictures, but has pretty much given me free reign on the design. So anyway, I have been experimenting on using silicone molds- both ones I have purchased and ones I have made myself. 

By far, my most favorite silicone molds are ones from First Impression. Some of them are quite pricey, but worth it, if it's something you really need. I have gotten a couple of molds from them that I don't like. They are usually the ones that are very shallow. But, with only a couple of exceptions, First Impression molds are super! 


Recently, I have found a product to make my own silicone molds. It's called Amazing Mold Putty. It's a 2-part material that you blend together, and after a few minutes, it sets up. As long as I have an original of something I want to mold, this is great stuff. You can either buy it online, or at Michael's or Hobby Lobby. It costs about $20, but I wait until I have a 40 or 50 percent off coupon and use that. 


My favorite medium to use with these silicone molds is modeling chocolate. Click here for the recipe. I also use the ratio of 1 lb. of chocolate to 1/2 cup corn syrup when using Ghirardelli chocolate (my favorite). I like using modeling chocolate because it's easy to push into the molds, then you can plop it into the freezer for a few minutes, and it hardens really nicely so you can remove it from the mold. It's really fun to work with! So let me share with you a few things I've been working on. 

 I haven't painted any of these yet, but already they look amazing! 
 The detail is incredible!
 I tried making my own sand dollar mold, but it just didn't work out. This one is amazing!
 I love this! I added a little dark chocolate to white chocolate and the color already is pretty nice.
More coral... I'm so excited to use these on my cake!

Here are some of the molds I have made myself with the Amazing Mold Putty...


 Original starfish

Starfish made from modeling chocolate

Sunday, April 19, 2015

Red hats and yellow chicks... a cute combination!

So... my dislike for cupcakes is slowing dissolving... don't mind coming up with some cute and yummy creations as long as I have time. I still think some cupcakes are way too time consuming, but when some turn out really darling like these little chicks, I can't help but smile. These were cupcakes that I designed for a friend who belongs to the Red Hat Society. Her group is "Yellow Chicks." So she wanted cupcakes for a luncheon party, and this is what we came up with. They were lemon cake with lemon curd and lemon buttercream icing... one of my favorites! And, of course, I do have a special fondness for "chicks." 


Whistle While You Work...or Zing goes the strings of my heart...


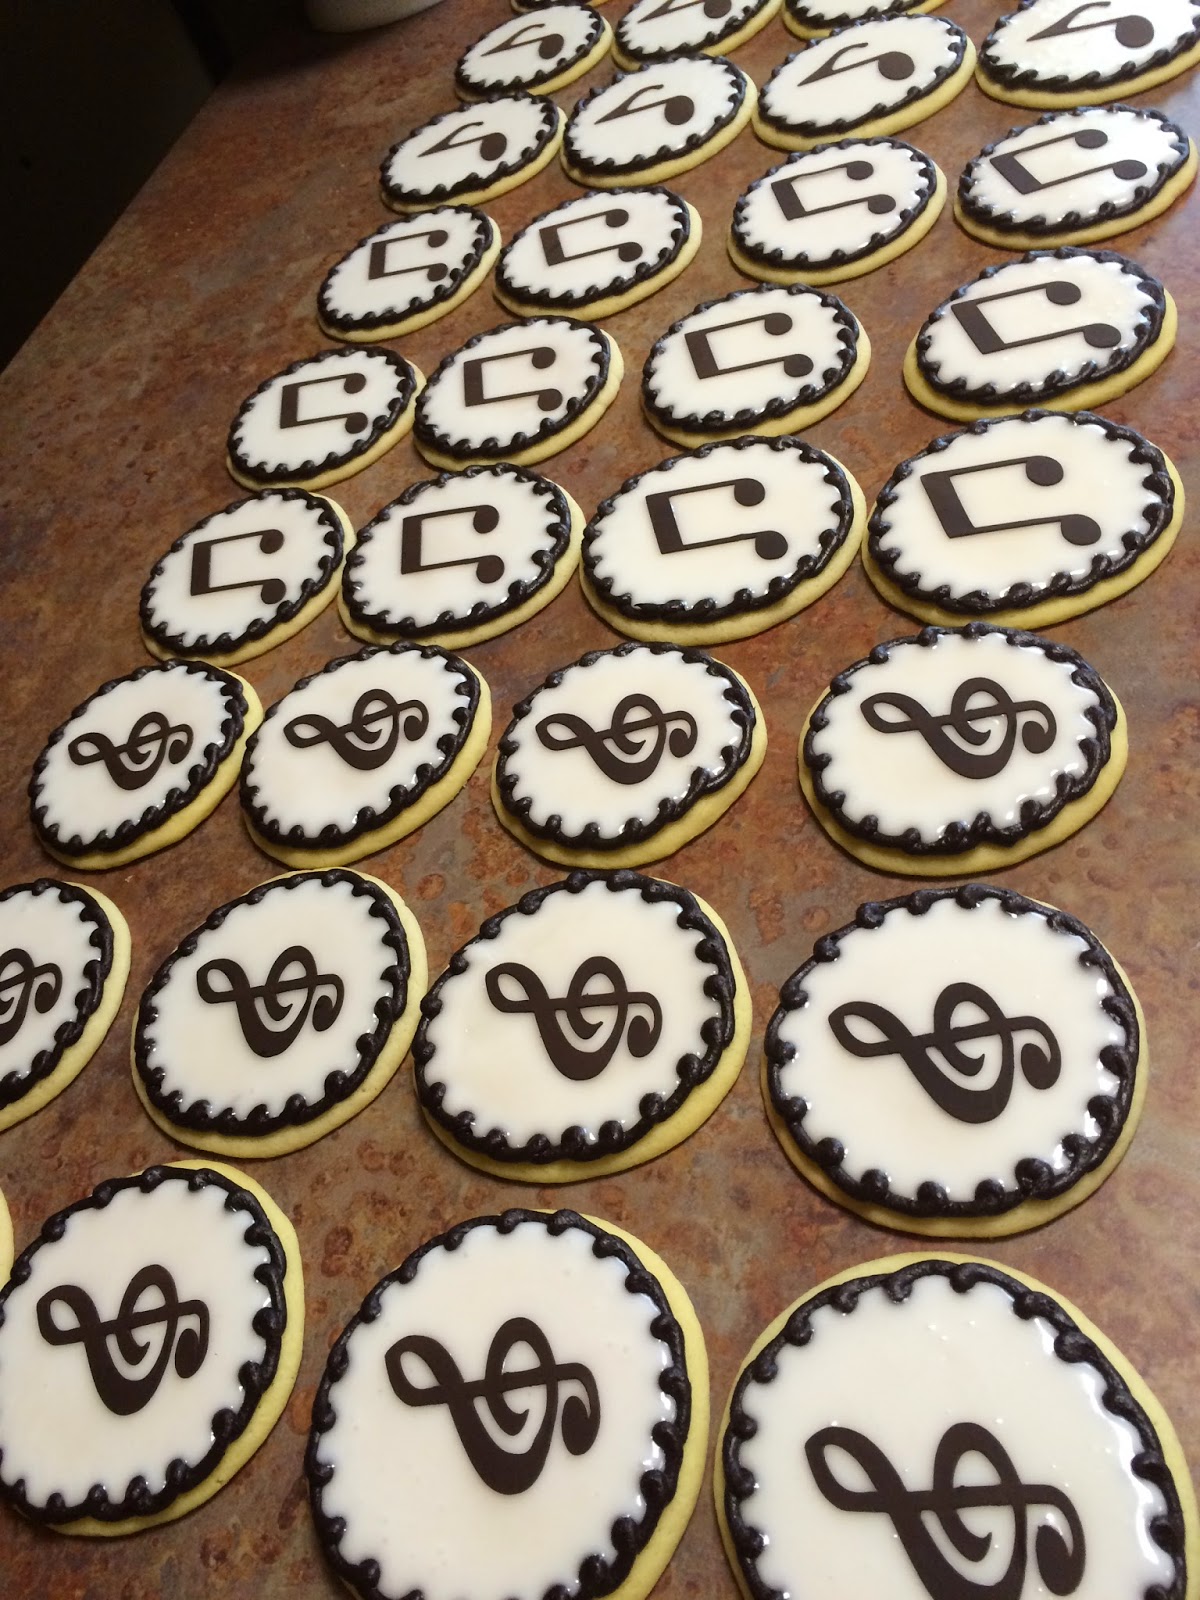
Either way, I almost felt like singing while I was decorating these cookies. These are my yummy 4 inch sugar cookies with poured fondant and musical decorations cut out with my Zing electronic cutter. For these cookies, I piped a dark chocolate border and then filled them in with poured fondant. Then, I simply placed the musical notes and treble clefs that I had cut out the day before on each cookie. For those of you that regularly follow my blog, you know that I very seldom use black in my decorating, but instead use Hershey's Special dark cocoa, or Satin Ice dark chocolate fondant. Both taste soooo yummy, and pretty darn close to being black without the nasty taste. For the sugar cookie and fondant recipes, click here

It just works easier if you put your fondant in a squeeze bottle to fill in the cookie tops, so a while back when I was at Sam's, I bought these cool large squeeze bottles with a much larger opening and they work so much better than the old small ones I had. A little over 2 bottles full did all 3 dozen cookies! The trick is to keep the fondant warm, so when it begins to cool off, just stick your bottle in the microwave for about 20 sec. or so, and you're good to go. 
Decorations cut out with Zing electronic cutter... I LOVE my ZING!

Comparison of the 2 different sizes of squeeze bottles.
Cookies after borders are piped.  
  
             Use squeeze bottle to fill inside the piping.

Use toothpick to coax fondant into the right areas.

Cookies covered with fondant.
Place decorations on fondant. If fondant has set, you can use just a bit of edible glue to attach the pieces.
 Finished cookies


Thursday, March 26, 2015

Best white cake recipe ... white almond sour cream cake!

White Almond Sour Cream cupcake with raspberry filling, vanilla buttercream, and toasted almonds

Here's another recipe that starts with a cake mix, but has lots of other ingredients added to it, so I consider it "almost scratch." I never liked white cake much until I started using this recipe. It has quickly become one of my most requested wedding cake flavors. The taste and texture are amazing, with a hint of vanilla and almond, but not overwhelming, and it is sooo moist! Any kind of filling and icing can be added. You couldn't ask for an easier cake to cut - a caterer's dream! The only drawback to this cake is that it takes a bit longer to bake - but oh, so worth the wait!

White Almond Sour Cream Cake

1 Duncan Hines white cake mix (16.5 oz.)
1 cup flour
1/2 cup + 2 1/2 Tbsp. sugar
1/2 tsp. salt
1 cup + 2 1/2 Tbsp. water
2 Tbsp. vegetable oil
1 tsp. pure vanilla
1 1/2 tsp. almond extract
7/8 cup sour cream
4 large egg whites

Preheat oven to 335 degrees. Grease and flour (2) 8 inch cake pans, and line bottom with parchment. Combine all ingredients in large mixer bowl at low speed, then beat for 2 minutes on medium speed. Fill pans a little over half full (more than a normal cake batter). When making cupcakes, fill cups fuller than normal. Tap cake pans on counter to release air bubbles. Bake until done, or toothpick inserted comes out clean. Remember, this cake will take longer to bake than your normal cake.


Sunday, March 8, 2015

Best Chocolate Cake Recipe... from a mix!


Not all cake recipes need to be made totally from "scratch." As a matter of fact, some of my most popular cake flavors start with a mix. The cakes turn out moist, flavorful, and with a good texture to cut. Here is my "go to" recipe for the best chocolate cake. I always use Duncan Hines cake mixes. Even though they have changed the formula and size of the mixes over the 38 years that I have been decorating, I still believe it's the best cake mix you can purchase. This recipe makes just enough batter for (2) 8 inch by 2 inch round cake pans. 

The Best Darn Chocolate Cake

1 Duncan Hines cake mix (Devil's Food or Dark Chocolate Fudge)
1 small box chocolate instant pudding
1/2 cup water
1/2 cup oil
1 cup sour cream (do not use light or fat free)
4  large eggs

High Altitude: Add an extra 1/2 cup flour

Preheat oven to 335 degrees. (340 degrees for high altitude.) Grease and flour (2) 8 inch round cake pans and line with parchment paper. 

Combine all ingredients on low speed, then beat for 2 minutes on medium speed. The batter will be quite thick. Spread into prepared pans, and bake for 35-40 minutes or until done. (I always test with a tootpick to see if it comes out clean.) At our altitude, this cake will still sometimes sink slightly in the center, but it is easy to just level it off. When you bake your cakes at a lower temperature, they will turn out more moist. You may need to bake them for a bit longer, but be careful to not overbake. Cool thoroughly on cooling rack before icing and decorating. 


One of the sister missionaries, Sister Botts, serving in our area had a birthday last week, so I made her a chocolate cake with this recipe. I added raspberry and fudge fillings, and chocolate buttercream... a great combination, but too tempting for this Weight Watcher. I had to have a small piece. Happy Birthday to Sister Botts... isn't she cute?

Friday, February 27, 2015

How can something so amazing be so simple?


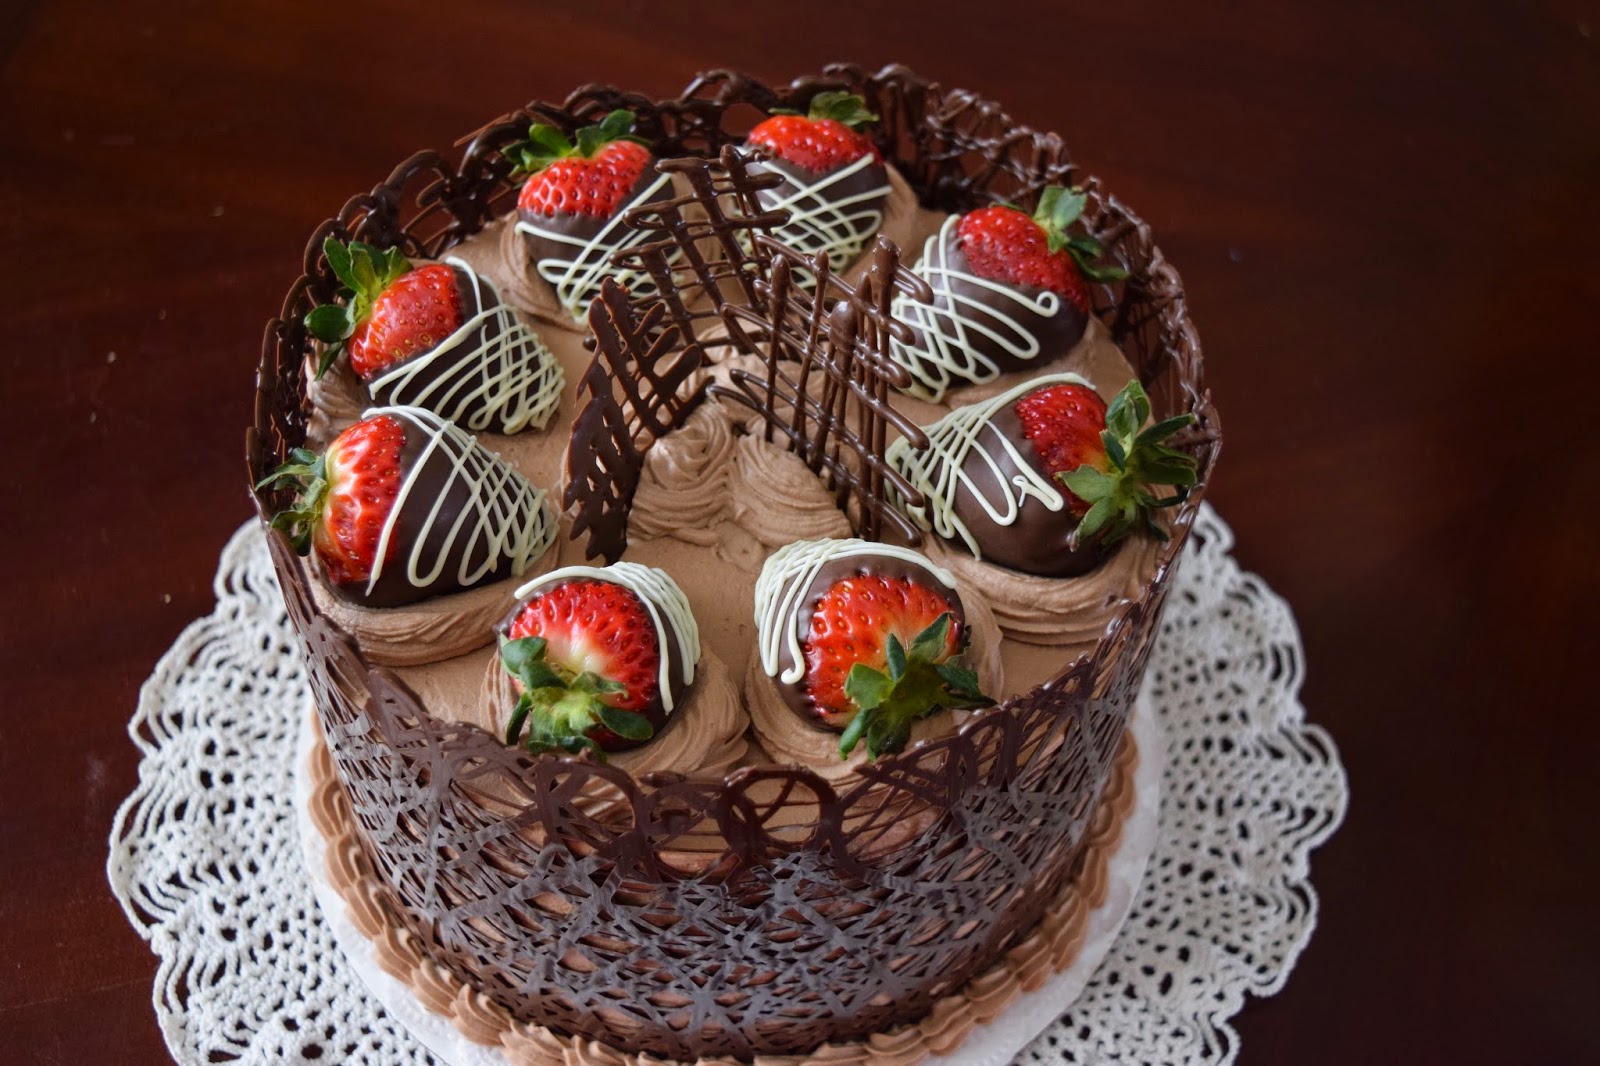
I have been wanting to design a cake with a chocolate cage for awhile, and today I finally had the chance. I didn't know quite what to expect as far as difficulty, but I was thrilled at how simple this technique was. And to see the final results... well, nothing less than amazing! My hubby thinks I'm absolutely crazy when I get so excited about food, but every now and then, it just happens. Nothing gets me more excited than when I have success with a new cake design! This particular cake was my strawberry shortcake flavor - rich yellow cake with 3 layers of whipped cream and fresh strawberries, iced in chocolate whipped cream. It was hard not to lick my fingers on this one, especially with the extra chocolate thing going on. 

In case you would like to design a cake like this, I will attempt to talk you through it. For this particular cake, I used my favorite yellow cake recipe, baked it in (2) 8 inch round pans, and then sliced each layer in half. Between each layer, I spread a layer of real whipped cream, and sliced fresh strawberries. Then I iced the entire cake in chocolate whipped cream. I learned that the best way to make chocolate whipped cream is by adding cooled chocolate ganache to the cream during the last stages of whipping, then continue to whip until combined and stiff peaks form... yummy. After you have iced it smooth, pop it in the refrigerator to keep it cool. Next, wash and dry some nice strawberries. Make sure they are room temperature, then dip and decorate them. Set aside. 


Before starting to make your chocolate cage, you need to know how large to make it. After your cake is iced, measure how tall it is, then use a ribbon or string to measure the diameter of the cake. Make sure you do this after the cake has been iced to allow for the extra size. For some reason, I actually came up just a bit short, so next time I would add a couple of inches. This was an easy fix, however, by just piping another small portion and adding it on at the end. 


Cut a piece of acetate the size you need. In my case my cake was 5 inches tall (because of the 3 layers of filling and fruit) and 26 1/4 inches around. Since I wanted my chocolate cage to be a little taller than the top of the cake, I cut my acetate 6 inches high. I also cut it a little over 26 inches long, but I would add a couple inches next time. As far as acetate goes, it is best to use 3 mil, since it is easier to wrap. Since it is hard to find acetate around here, I cut a couple of laminating sheets the size I needed and taped them together. It worked fine, as long as I made sure that I piped on the shiny side. You can purchase acetate strips online, which I will do with my next order. 

The next thing you need to do is melt your chocolate and prepare your piping bag. You can either use a parchment cone, or a piping bag with a tip, whichever you feel more comfortable with. I prefer a piping bag only because I have more control. When I am working with chocolate, I use a silicone piping bag. To make it easier to fill, I put it inside a glass and then pour in the chocolate. The chocolate I like to use is Ghirardelli dark dipping chocolate. It tastes great and I don't have to worry about tempering it. Another tip... recently I purchased two sets of small silicone bowls... I love silicone (the topic of another blog post). They are perfect for melting chocolate and isomalt, because when you're done, and the chocolate or isomalt hardens, it literally peels off the inside of the bowl and you have no waste. 


Snip a tiny bit off the end of your parchment cone, or fit your bag  with a small tip. I used a #3. On the precut acetate sheet (make sure it is a shiny side), pipe any design you wish. The idea is to make everything touch, and not to make it too flimsy, or it will break. Go over it in several different directions. Don't worry about going over the edges. After you are done, lift it up and allow it to set up in a different area, so you will have clean edges. Let it  set up to the point where it begins to lose its shine, but is still flexible enough to bend around your cake. Mine set up very quickly, but it will depend on the kind of chocolate you use, and how warm it is. You can also do this on parchment paper, but it will not be as shiny as if you use acetate.


I also made some extra little chocolate garnishes for the top of the cake.


When the chocolate is set, wrap it around the side of the cake, pressing gently. At this point, you can pop it back into the refrigerator for a few minutes to make sure it is set. Mine set up so quickly on the cool cake, that I didn't need this step, but it was also quite cool in my kitchen. Once it is set, gently remove the acetate or parchment backing. Mine came off very easily. Then, stand back in amazement... it is so cool! 


I finished my bottom edge with a piped border, but that is not really necessary as long as you clean off your cake board or serving platter. Finish your cake off with chocolate whipped cream rosettes, the decorated strawberries, and garnishes. 


Get ready for your guests to be impressed, and give you lots of compliments! 

Monday, February 23, 2015

Have you tried quinoa?


As you know, most of the recipes, tutorials, or information I post are usually about cakes, cookies, or other sweets. However, now and then I get really excited about something other than sweets. So my latest yummy excitement is about quinoa. Quinoa is an ancient South American grain that was eaten by the Incas, and has become increasingly popular as of late here in North America. Not only does it have wonderful nutrional value, but it tastes really great, and can be substituted for rice or other grains in many recipes. It has been called a "superfood" because it is a complete protein, containing all of the essential amino acids. There are 3 varieties of quinoa - white, red, and black. Each has a little different taste and texture. Lately, I have been using mostly red quinoa, as I was able to purchase a large bag at Costco not long ago. It has a wonderful "nutty" flavor and texture, and is a great addition to many recipes. I cook up a batch in my electric pressure cooker, store it in the refrigerator, and then just add it to different recipes. Tonight, for example I threw in the leftover quinoa that I had in my refrigerator into some taco soup, along with the beans and ground turkey. 

So here are the basic directions for cooking red quinoa in the electric pressure cooker. You can also cook it on the stove top.

2 cups red quinoa
2 1/2 cups liquid (any kind of broth or water)
1/2 tsp. salt

Stir all together in pressure cooker. Some people say you should soak it first and then rinse it, but I don't find that necessary. Lock the pressure cooker and set the timer for 9 minutes. When the timer goes off, use the quick release lever to release the pressure. When it is safe to open your cooker, open the lid and fluff up your quinoa. It should be tender but firm, and the little sprouts should be visible on each grain. 

To cook quinoa on the stove top, simmer covered for 30-35 minutes or until liquid has absorbed. Remove from heat and let sit covered for 5 min. to finish steaming. When done, remove lid and fluff. When cooking white quinoa, reduce the amount of liquid to 2 cups. 


A couple of nights ago, I made the most amazing stuffed bell peppers, with quinoa and ground turkey. We are not much into beef at our house, but you can definitely substitute ground beef for the ground turkey, or leave it out all together if you are vegetarian or vegan. Again, I made these in my electric pressure cooker (quickly becoming one of my favorite kitchen tools), but you can also bake these in the oven. 


Easy Stuffed Bell Peppers

1 lb. ground turkey (or ground beef)
Approx. 2 cups cooked quinoa (cooked in chicken broth)
1/2 small onion, chopped
1 15 oz. can tomato sauce
Salt and pepper to taste
4 medium to large bell peppers (any color, I like the red, yellow, and orange ones because  they're sweeter)

Wash and cut the tops off the peppers. Clean out the inside membranes and seeds. Brown ground turkey with onion in skillet. Add cooked quinoa, 1/2 can tomato sauce, and salt and pepper to taste. Stir to combine. Fill the peppers and place on rack in bottom of pressure cooker. Carefully spoon the remainder of the tomato sauce over the peppers. Add 1/2 cup water to the bottom of the pressure cooker. Lock the cooker and set the timer for 4 minutes. When the timer is done, use the quick release lever to release the pressure. The peppers are tender, but still firm. If you like them a bit softer, then add another minute to your cooking time. If cooking in the oven, bake at 350-375 degrees for about 1/2 hour, or until done. Use a fork to check for doneness. 


Very delicious... and healthy. Enjoy!