It's that time of year again... the Christmas season! Not only do I love this time of year because we get to celebrate the birth of our Savior, but we find this season the perfect time to share love and gifts with others.
We live on this wonderful little street in Colorado Springs called Rawhide Lane, but this time of year it could be called "Christmas Lane." 3 doors down from us, we have a neighbor that goes all out for decorating for Christmas. Last year, he began to add other neighbors to his display, and this year 7 houses are included in the Christmas light and music show. The lights are all synchronized to a music channel that you can tune in to. We also have a traditional block party during the season, complete with a fire pit, hot chocolate, and sweet treats. Yes, our street gets pretty busy during December, but it's just part of the fun.
Since we love living in our neighborhood and appreciate having wonderful neighbors, I always try to make a special treat for them at Christmas time. This year I made Yule Log Cakes. I have made cake rolls before, but never actually made a yule log. So, of course, I went to the trusty internet and did some research about the yule log tradition, and different versions of the yule log cake, and then came up with my own design. It was truly a fun project! Last night hubby and I delivered the festive treats to our neighbors and it was so much fun to see the the smiles on their faces.
There were different parts to be made before I could assemble the final yule log cakes. You can find the recipes near the end of this post. I also found a short version of the history of the yule log or Buche de Noel, if you speak French. We'll start with that...
First, I found out that a yule log cake is not complete without meringue mushrooms. If you have never made these, you must try them. They are easy and yummy, and look like the real thing. You could even just give a basket of these to someone as a gift. Just tie them up with some clear cellophane wrap and a pretty ribbon.
Pipe out mushroom caps and stems by using a decorating bag fitted with only a coupler. Sprinkle caps with cocoa powder. Bake at 200 degrees for 2 hours.
Trim off top of stems so they are flat and dip into chocolate.
Assemble cap and stem and let set until hard.
Don't they look real? They're so cute!
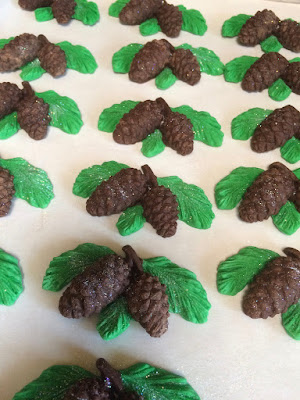
Next, I molded pinecones and greenery from modeling chocolate. You can also just pipe pinecones from stiffened buttercream, but I thought these little guys looked cuter on the yule logs. Of course, I used one of my favorite blue silicone molds from First Impressions.
Start by pressing in the chocolate modeling chocolate first.
Then add the greenery.
After the mold is filled, clean the edges and smooth out with your finger. Then pop in the freezer for a few minutes.
I sprinkled just a bit of rainbow disco dust on each to make them sparkle.
The cake rolls are basically just a thin sponge type cake (or roulade) with a filling of your choice inside. I made mine easy by starting with a dark chocolate mix, but adjusting the ingredients a bit. I was able to get two small logs out of each pan.
I filled my cake rolls with vanilla mousse and folded in chopped maraschino cherries. Cut the roll in half diagonally, and also cut each end off diagonally.
You can ice your cake with either a buttercream icing or a chocolate ganache. To give the log the texture of bark, you can use an impression mat, or just draw a fork through the icing to give it a textured look.
After icing and letting the buttercream set for a few minutes, I used a bark silicone impression mat to get the bark texture.
Pipe a circular pattern on the ends of each log.
Pipe a simple shell border around the bottom and add the pinecones, mushrooms, and any other decorations you like.
Finally, sprinkle some powdered sugar on your log to resemble light snow.
Meringue Mushrooms from Meringue Powder
1/2 cup boiling water
3/4 cup granulated sugar
1/4 cup meringue powder
Cocoa powder (or cinnamon)
Melted chocolate
Combine sugar and water and stir until sugar is dissolved. Let cool to room temperature. Add meringue powder and beat with wire whisk attachment until stiff peaks form. Make sure that all of your utensils and bowls are grease free. Fill decorating bag with coupler only, or coupler with large tip. Pipe mushroom caps and stems. Sprinkle caps with cocoa powder or cinnamon. Bake in preheated 200 degree oven for 2 hours. Trim tops of stems with knife to make them flat. Brush or spread on melted chocolate on bottom of tops. Dip top of stems into melted chocolate and assemble with tops. Let set until hardened.
Click here for video and recipe for making meringue mushrooms from fresh egg whites.
Cake Roll Recipe
1 Duncan Hines cake mix
1 small package instant pudding
6 large eggs
1/2 cup water
1/4 cup oil
Beat eggs and thick and fluffy, about 5 minutes. Add remainder of ingredients and beat on low until fully incorporated. Spread on greased and parchment lined half sheet bun pan. Bake at 350 degrees for approximately 15-17 minutes or until toothpick comes out clean and cake springs back when touched. Immediately turn pan upside down onto a terry cloth towel which has been sprinkled with powdered sugar. Remove parchment paper and roll cake, starting at long end. Leave until fully cooled. Carefully unroll cake and spread with desired filling. Re-roll, wrap in plastic wrap, and chill until ready to ice. Since sponge cakes tend to be a little drier than normal cakes, you can brush a simple syrup on the cake roll before adding the filling.
Simple Syrup
Equal parts of water and granulated sugar
Combine sugar and water and bring to boil, stirring until sugar is dissolved. Simmer for 3 minutes. Allow to cool. May store in the refrigerator for about a month.
Click here for roulade recipe.
Click here for chocolate buttercream recipe


