Saturday, March 30, 2013

The baker's friend...

So, you went to take your cake out of the pan, and half of the cake stayed in the pan. Oh no! Try this easy little recipe and your cakes will never stick again. Another secret for a perfect release cake, especially if you're going to let them sit for awhile, is to line the bottom with parchment paper. I never bake a cake or brownies (or anything really) without parchment paper. It also keeps your pans looking new. 

Miracle Pan Release Goo
1/2 cup shortening
1/2 cup oil
1/2 cup flour

Whip, whip, whip and store in airtight container at room temperature. Yields 1-1/2 cups. Brush on your pans with a pastry brush or foam craft brush.

I have always just used equal portions of oil and flour, but have had to stir before using each time. This keeps the ingredients emulsified. If you don't make many cakes, make a smaller amount so it doesn't go rancid. 

 I keep my "goo" in a plastic container with screw top lid and use a foam craft brush that I keep in a ziplock bag between uses.
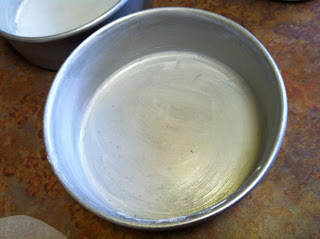
 Brush evenly over entire surface of pan.
Cut parchment paper just smaller than the pan and lay over "gooed" bottom.
Pans ready for cake batter. 

Monday, March 25, 2013

Winter time is soup time!

Spring time in the Rockies is like winter time anywhere else, and when it's cold outside like it has been here lately, it's a great time for making a big pot of soup. Two of our favorite soups here at the Leavitt home are Broccoli and Wild Rice Soup (courtesy of my friend Ann Griggs), and Whole Enchilada Chicken  Soup (from Hungry Girl). Both are very hearty soups. We make a big pot and it lasts the two of us for sometimes 3 days. Thank goodness I have a husband who loves leftovers. These soups seem to get better each time they're warmed up. As a side note, my husband does not like broccoli, but he loves this soup. I have included the recipes below. Give them a try. I know you'll love them as much as we do.


BROCCOLI AND WILD RICE SOUP

(1) 6 oz. package Uncle Ben's wild rice mix (I've also used other brands)
5 1/2 cups water
1 can chicken broth
1 1/2 cups cooked and chopped chicken breast (I've also used left-over turkey)
(1) 10 oz. package chopped frozen broccoli (you can also use fresh broccoli-finely chop and just cook longer)
2 medium carrots, peeled and shredded
1 small onion, diced
1 can cream of chicken soup
(1) 8 oz. package cream cheese, cubed

Combine rice mix, seasoning packet and water. Cover and bring to a boil. Reduce heat and simmer for 10 minutes. Stir in chicken broth, broccoli, carrots, onion, and chicken. Cover and simmer 5 more minutes. Stir in cream of chicken soup and cream cheese. Cook and stir until cheese is melted.

Tips from Cathy:
1. I usually use 1 large head of fresh broccoli, finely chopped (in food processor). I also finely chop my carrots and onion in the food processor instead of shredding them. Then I cook them with the rice mix in the water until tender, and then add the other ingredients.
2. To make this recipe more quickly, I just add a large can of chicken from Costco.
3. To make this recipe low fat, I use the low fat cream of chicken soup and fat free cream cheese. This makes approx. 7 servings @ 7 points plus/serving


The Whole Enchilada Chicken Soup

3 cups fat free chicken broth
1 ¼ cups finely chopped celery
½ cup diced sweet onion
3 cups green enchilada sauce
(1) 15 oz. can pure pumpkin
(1) 4 oz. can chopped green chilies
10 oz. cooked chicken breast, chopped or shredded
1 cup frozen corn
Hot sauce to taste (optional)
 
In large pot, bring broth to low boil. Add celery and onion and simmer until tender. Stir in enchilada sauce and pumpkin. Once soup returns to a low boil, add chilies, chicken and corn, and mix well. Cook an additional 3-5 minutes, until heated thoroughly. Add hot sauce and serve with shredded cheese, crushed tortilla chips, and sour cream if desired.

 Tips from Cathy:
 1. You can add canned chicken to make preparation quicker. I usually add 2 cans.
2. I also add one can of black beans and one can of kidney beans (both rinsed and drained) to make the soup more hearty. 

Wednesday, March 20, 2013

Peanut Butter and Chocolate...My Favorite!


I am a peanut butter and chocolate lover. I have even passed that trait on to my children. That being said, whenever I see a recipe with those two wonderful ingredients, I take note. I needed something quick and easy to make tonight to take to a church social as part of the refreshments being served. I remembered this easy no-bake peanut butter chocolate squares recipe that I pinned on Pinterest, so I pulled it up, tossed the ingredients together, and it turned out perfect first time... tastes allot like a Reese's Cup. I was quite impressed for something so easy. So if you are a peanut butter and chocolate lover like me, go ahead and give this recipe a try. I think you will be pleasantly surprised. 

Reese's Peanut Butter Bars
(from Let's Dish)

1 cup melted butter
2 cups fine graham cracker crumbs (boxed kind, or grind them in food processor)
2 cups powdered sugar
1 cup + 4 T. peanut butter
1 1/2 cups semisweet chocolate chips

In a medium bowl, mix together until well blended the melted butter, graham cracker crumbs, powdered sugar, and 1 cup of the peanut butter. Press evenly into the bottom of an ungreased 9 x 13 pan. Melt the chocolate chips with the remaining 4 T.(1/4 cup) of peanut butter, stirring until smooth. Spread over the peanut butter layer. Refrigerate for at least one hour before cutting into squares.

Sunday, March 17, 2013

How to keep Home Teachers coming...COOKIES!

In our church, we have a couple of men who are assigned to visit certain families each month. They normally visit with us to see how we're doing and then give us a gospel message. I have found the best way to keep our home teachers coming each month. COOKIES! Yes, I bake fresh cookies right before they come to visit. They always make an appointment with us-usually on Sunday afternoon-so I bake cookies just before they come. Today I "killed two birds with one stone," or in other words, made cookies for the home teachers and another family as a thank you gift for helping Bruce with his pickup problems last week. Today's special cookies...Marbles! These have traditionally been the favorite cookie in the Leavitt home, even though some others are quick becoming favorites also...like the peanut butter chocolate chip cookie. Marbles are soft and chewy, mainly because of the sour cream that is added along with the eggs and vanilla. This recipe comes from Mrs. Fields Cookie Book. The cookies are baked at a lower temperature-300 degrees for a longer time-22 minutes, but the result is amazing! You've got to try these. I'm sure they will become one of your family favorites too.


Marbles

2 cups all purpose flour
1/2 tsp. baking powder
1/4 tsp. salt
1/2 cup light brown sugar, firmly packed
1/2 cup granulated sugar
1/2 cup salted butter, softened
1 large egg
1 tsp. pure vanilla extract
1/2 cup (4 oz.) sour cream
1 cup chocolate chips

Preheat oven to 300 degrees. Combine flour, baking powder, and salt in medium mixing bowl. Set aside. Combine sugars in large mixer bowl at medium speed. Add butter and beat until grainy. Add sour cream, egg, and vanilla and mix on medium until light and fluffy, scraping bowl as needed. Add flour mixture and blend at low speed just until combined. Do not overmix. Melt chocolate chips in microwave or in double boiler, being careful not to burn. Cool slightly, and pour over batter. With wooden spoon or rubber scraper, lightly fold melted chocolate into the dough. Do not mix completely into dough, thus giving the dough a "marbled look." Drop by rounded tablespoons, 2 inches apart onto   parchment lined cookie sheets. Bake approx. 22 minutes. DO NOT BROWN. Quickly transfer cookies to cool surface. Makes approx. 2 doz. 

Traveling out of state with a wedding cake...

So, you may have seen the Cake Boss deliver completed cakes across the country, but as for me, I wouldn't dare try to do that. I just returned home from a trip to Utah where I delivered and decorated a cake for Heather and Matt. Heather is my husband's second cousin, and I told her a couple of years ago that I would make her wedding cake when she got married. Since we were driving, I knew I would be able to bake the cake at home, transport the cake in the pans, and then decorate it after I got there. I had done this same thing several years ago when my son Tom got married in Utah, so I knew I was good to go. Here was my last week's schedule...
Tuesday- Made buttercream icing and fillings; assembled tools, cake boards, etc.
Wednesday- Baked cakes, cooled, and covered with plastic wrap; measured out fondant, packed equipment and cakes. Left at 4:30 pm for Utah. 
Thursday- Arrived in Orem, Utah early morning after a few rest stops along the way. Two hour nap and visited with relatives, then off to the church kitchen to decorate the cake. Finished around 8 pm. 
Friday- Attended wedding at Mt. Timpanogos LDS Temple at 2 pm; after pictures, went back to church to assemble cake and arrange flowers on cake. Reception from 6-8 pm. Cut the cake for guests, and cleaned up afterwards. Got to bed about 10 pm. 
Saturday- Left to come back home about 9:30 am, drove all day and got back home to Colorado Springs a little before 8 pm. 

A quick trip, but glad we were able to go to the wedding, and that I was able to help out by making the cake. It's just a good thing I don't do this very often.


Monday, March 11, 2013

How to mold a great cake decorator...

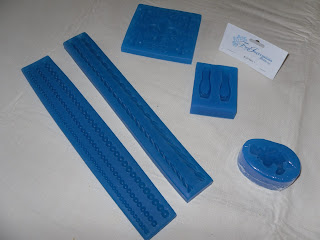
Sometimes when I design a really impressive cake, the guests ask me, "how did you do that?" Many times, my answer is silicone molds. I love blue silicone molds! They can make your decorating go from average to spectacular. Yes, they are very pricey, but can make your work so much easier.  The best molds to buy are from a company called First Impressions. I have several now that I use, and whenever I place an order on line for something else, I often add another one or two silicone molds to my order. I have one that I have not even tried yet (baby mold), but am anxious to test it out when I have some free time (yea right). 

Here are a few molds that I have...


I designed a few cakes this last weekend when these molds came in really handy...

Ballet slipper mold
Ballet tutu cake for Maggie
 Fleur di lis mold
Rope mold
Eagle Scout cake for Spencer

I use this mold allot when doing wedding cakes. It makes really pretty fondant bead borders.


I usually work with half fondant/half gumpaste in the molds, but have also used half fondant/half modeling chocolate. You can use all fondant, but you need to put the molds in the freezer for a few minutes before unmolding. You may want to do this with all of your more intricate designs to make sure they unmold easier, and keep all of the details. 

So give these molds a try... you'll love them. One side note, keep all your molds together, so you don't duplicate any like I did :).


While I was cleaning and organizing my fondant tools this morning, I found a second fleur di lis mold in the bottom of the box. It would have been nice to use two of these instead of one as I was using the largest cavity to make 20 scout emblems for the Eagle cake... one at a time. 

Saturday, March 2, 2013

No More Flat Cookies


*Follow-up on this recipe is at the end of this post.

When we lived back in Arizona, baking was much different than when we moved here to the Springs at almost 7,000 feet altitude. I always used my normal Mrs. Field's chocolate chip cookie recipe and they turned out great. When we moved here, I used the same recipe and my cookies always turned out flat. They still tasted fine, but looked pretty awful. I have been searching for a good recipe to replace my old one and I finally found one that is a keeper. The recipe calls for a simple surprising ingredient... cornstarch. Who would have guessed? This dough is much stiffer than your normal chocolate chip cookie dough, but the end result is absolutely wonderful. For added flavor, try sprinkling just a little sea salt on top before baking, and please, please, do not over-bake your cookies. 

Best Ever Chocolate Chip Cookies
3/4 cup butter
3/4 cup brown sugar
1/4 cup granulated sugar
1 egg
2 tsp. vanilla
2 cup all purpose flour
2 tsp. cornstarch
1 tsp. baking soda
1/2 tsp. salt
1 c. bittersweet chocolate chips (I use Ghirardelli)
Opt: 1/2 cup chopped walnuts or pecans
Opt: sea salt for sprinkling on top

Preheat oven to 350 degrees. Cream together butter and sugars until light and fluffy. (Use paddle attachment with a stand mixer.) Blend in egg and vanilla. Mix in flour, cornstarch, baking soda, and salt, just until incorporated. Stir in chocolate chips and nuts. Using a standard sized cookie scoop or tablespoon, drop dough onto a prepared baking sheet. If desired, lightly sprinkle sea salt on top of each. Bake for 8-10 min. or until barely brown around the edges. (The tops will not brown, but DO NOT bake longer than 10 minutes. Let cool on the baking sheet for 5 minutes, then remove and let completely cool on wire rack.

Tips from Cathy:

1.  I always bake my cookies on parchment paper lined baking sheets.
2.  The trick is to not over-bake your cookies-even if they look like they are not quite done; let them finish baking on the cookie sheet after you remove them from the oven. So many people bake their cookies too long and then you end up with a hard dry cookie.
3.  I don't always sprinkle the sea salt on top of the cookies because sometimes I forget, but I think it adds a really nice flavor. Just don't go too heavy on the salt-just enough to bring out the other flavors.
4.  I think Ghirardelli makes the best chocolate chips. The dark chocolate/bittersweet ones are the best. Be careful not to eat too many right out of the bag. :)
5.  This dough is stiffer than your normal chocolate chip cookie dough, but makes a cookie that does not go flat, especially in high altitudes.
6.  I usually make a double recipe, bake a couple dozen, and then roll the leftover dough into a roll and put it in the refrigerator. If your dough is cold when you bake it, add an extra minute (no more) to the baking time.

Surprise ingredient ... cornstarch
 Roll up extra dough and store in refrigerator.
 Let cookies finish baking on parchment lined baking sheet for 5 minutes before removing to cooling rack.
 Finished product ... yum, yum!


*For one reason or another, I still can't get these cookies to always turn out when I make them at our altitude. For example, I actually made 50 dozen (yes, that's 600 cookies) for my granddaughters' PTA Christmas event, and they all turned out flat...tasted good, but just didn't look very pretty. What a disappointment. So, I have been hunting for a new high altitude chocolate chip cookie recipe ever since. I think I finally found one. Click here for the new recipe.